The most frequently asked questions about the Call Script Prompter service:
- Working with the script
- - How to create a script
- - How to edit a script
- - How to insert fields into the script
- - Script and call editor settings
- Creating and Importing Custom Fields
- - How to create fields
- Creating standard phrases and adding them to the script
- - How to create and use standard phrases in scripts
- Work in the CRM
- Working in call mode
- - How to make a script call
- - How to fill in the fields in a call
- Working with reports
- - Scripts report
- - Call report
- - Performance Report
- Working with the voice trainer
- - What a voice trainer is for and how to work with it
- Work with employees
- - How to add employees
- - How to block and delete employees
- - How to provide rights for staff to use scripts
- Service payment
- - How to pay for the service
- Account deleting
- - How to delete an administrator account
- - How to delete an employee's account
Working with the script
How to create a script
Option 1 - Utilize a script template
-
Navigate to your account and select the "Import script from file" option.

- You will encounter two choices - either download a script in the Call Script Prompter format or from other formats. Should your script deviate from the Call Script Prompter format, you'll be prompted to convert scripts (a paid service). For scripts saved in Call Script Prompter format, you'll be prompted to either locate it on your computer or drag it into the script import window area.


-
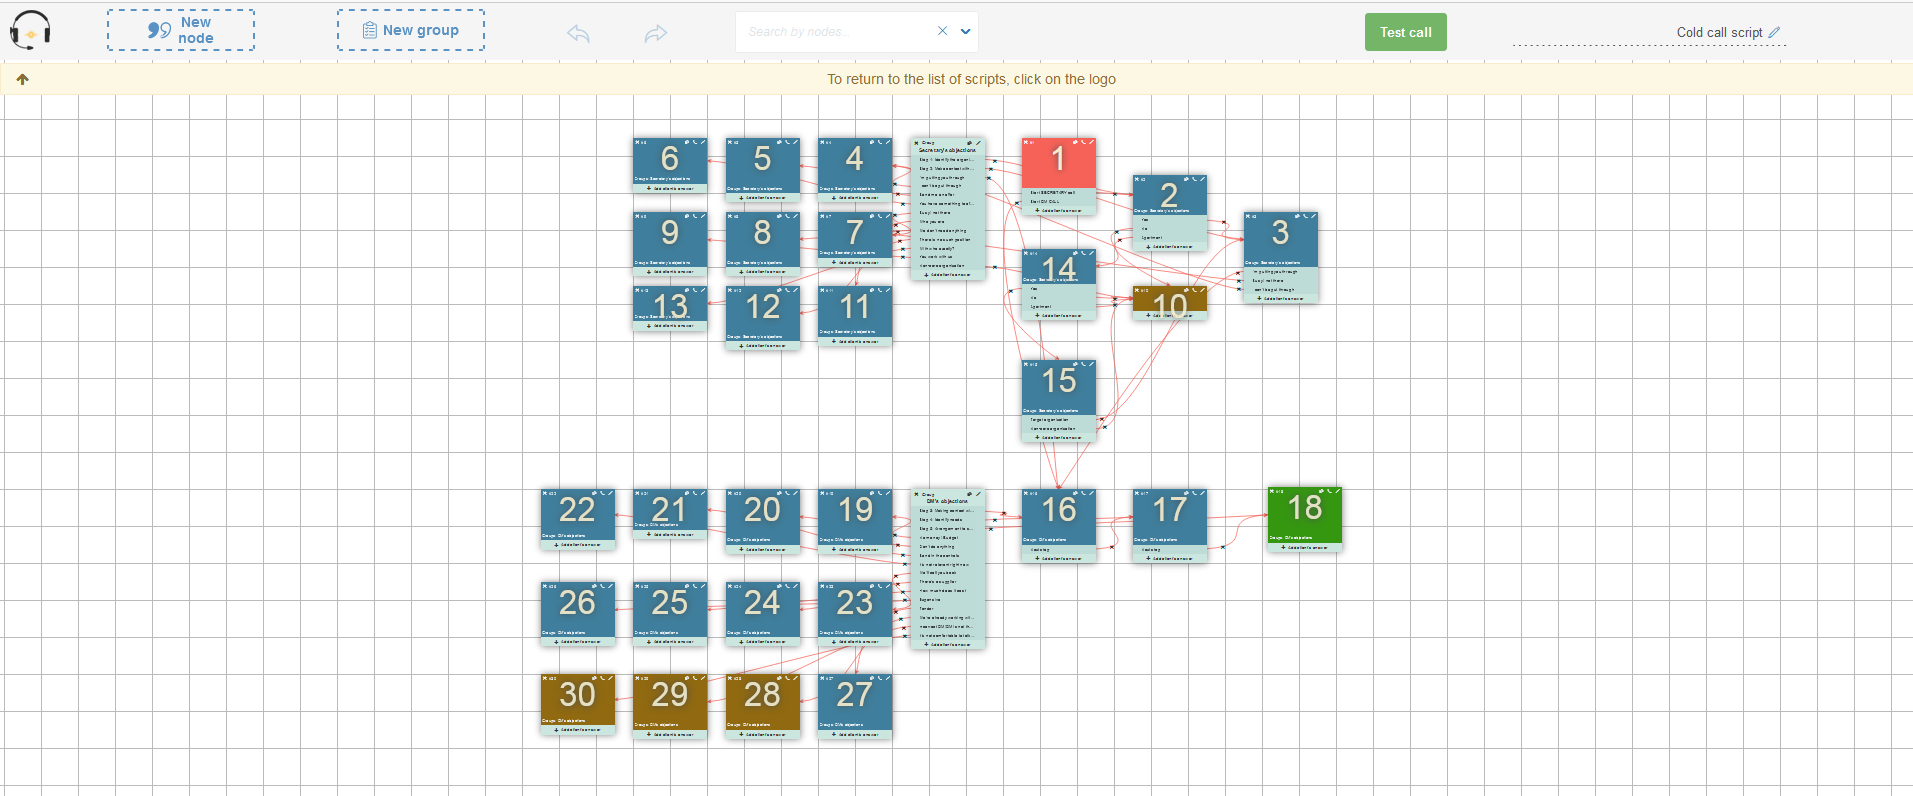
Once you've selected a script to import and clicked the "Start" button, the tree structure of the loaded script will unfold. Each script comprises nodes linked together. A node contains the manager's dialogue (upper blue section) and customer response options (light blue lines below the manager's dialogue). Each customer response option correlates with the manager's dialogue (another node or script). To enlarge the script, scroll the mouse wheel. You can create and edit nodes, responses, response groups, and rename the script by clicking on the script name field in the upper right corner. To exit script editing mode, click the tube icon in the upper left corner.
-
The control panel in your personal account showcases a list of scripts. Adjacent to each script name are control buttons. Hovering over a button reveals a tooltip, providing insight into the action you can take by clicking that button.
Click the handset button to commence the call mode.
To continue script editing, click the pencil button.
Unnecessary scripts can be archived (folder button).
You can also duplicate scripts, export them, and configure access for employees.

Option 2 - Develop your script from scratch.
-
Access your account and select "Create a new script" in the upper left corner.

-
This initiates a blank script window for your customization, where you can create nodes, responses, and response groups. Rename the script by clicking on the script name field in the upper right corner. To exit script editing mode, click the tube icon in the upper left corner.

-
The control panel in your personal account displays a list of scripts. Next to each script name are control buttons. Hovering over a button reveals a tooltip, providing insight into the action you can take by clicking that button.
Click the handset button to commence the call mode.
To continue script editing, click the pencil button.
Unnecessary scripts can be archived (folder button).
You can also duplicate scripts, export them, and configure access for employees.

How to edit a script
-
Navigate to your account, choose the script you wish to modify, and click the edit button represented by a pencil icon. This action will initiate script editing mode.

-
There are several methods to create a new node:
- Use the "New Node" button.
- Double-click on an empty area within the script editor.
- Drag the "New Node" button into the desired position within the script workspace.

- To enhance the performance of the editor on low-powered computers, an automatic mechanism is employed to disable the display of connections between nodes on complex scripts. If maintaining visual connections is crucial, you can enable them in the "Editor settings" by unchecking the "Enable fast script loading" option. Conversely, you can disable connections to expedite editor performance.

-
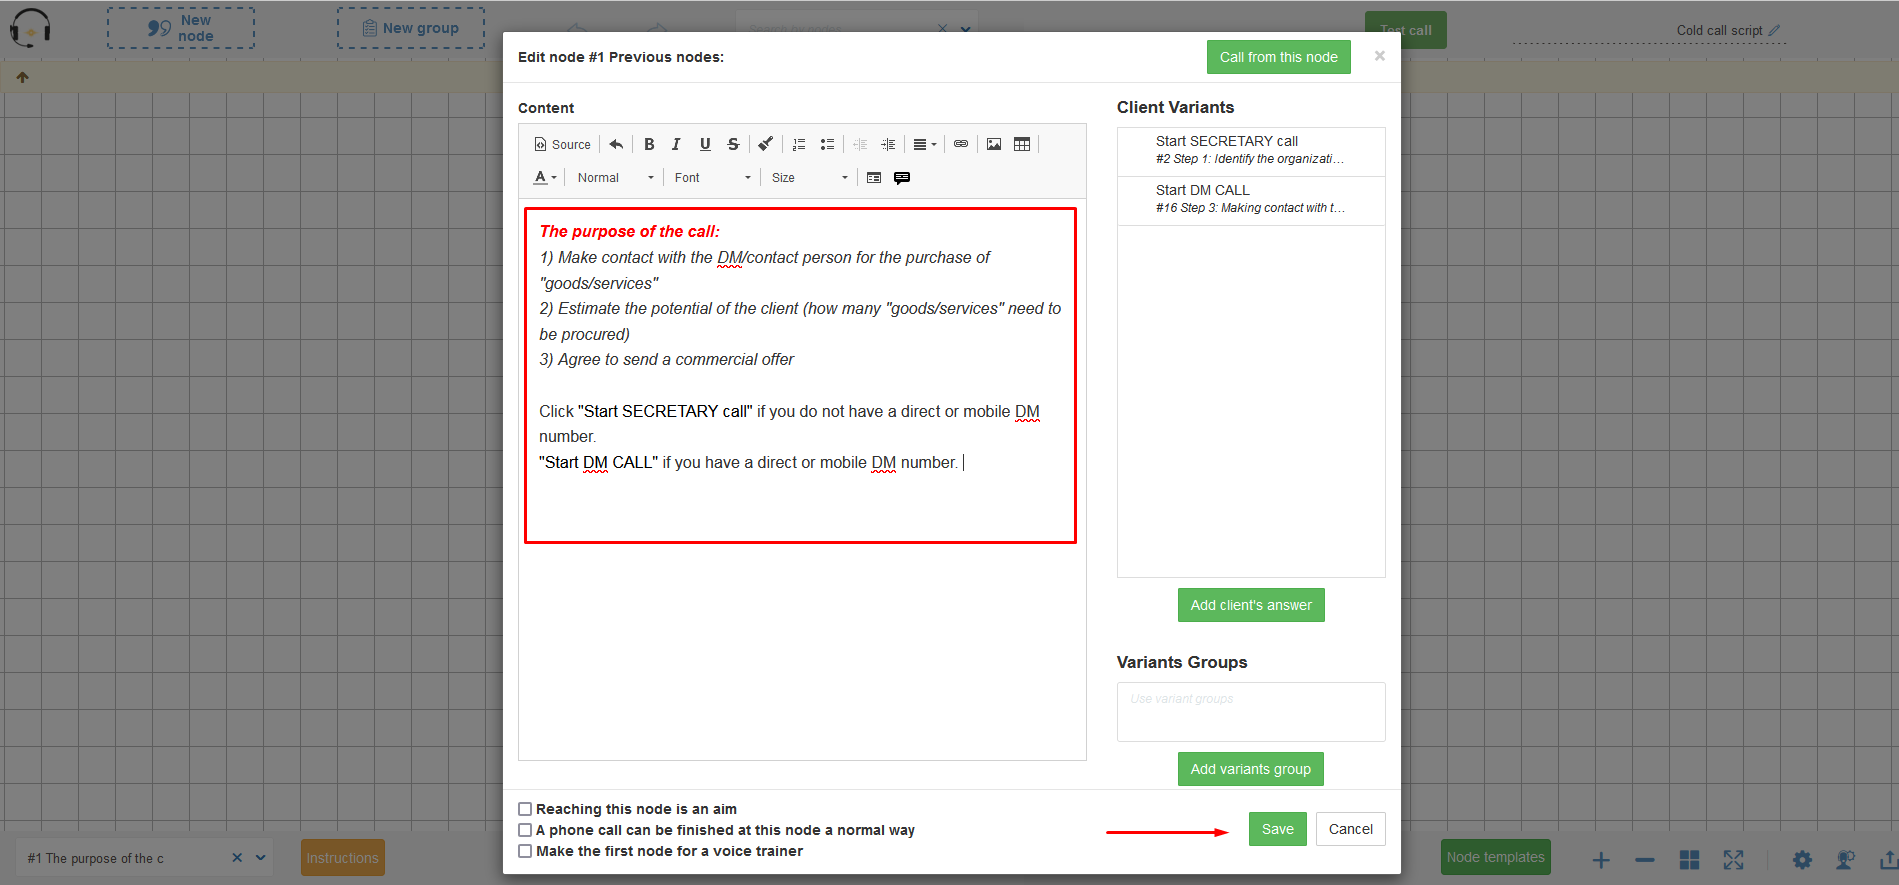
When you open a new node, it prompts you to input the purpose of the call and the initial operator phrase (for the first node) or subsequent operator phrases as per the script logic. Upon saving, you may designate this node as the starting point for calls. You can always change the starting node by selecting another node from the dropdown menu in the lower left corner.
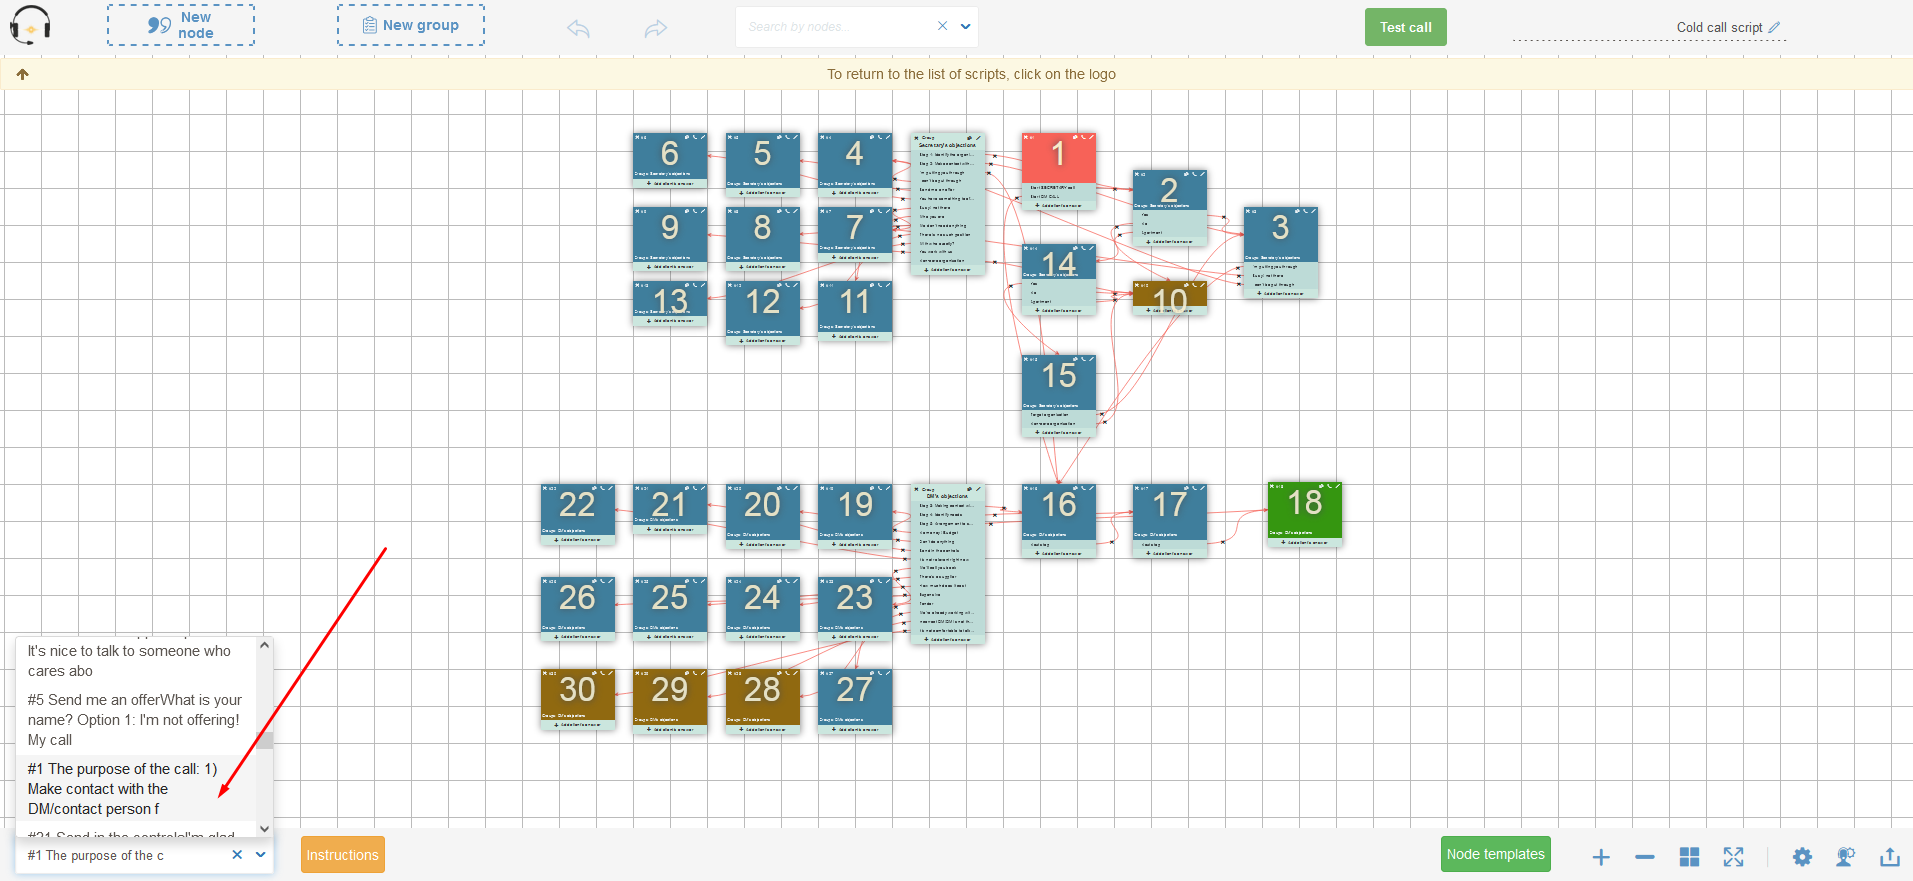
- You can add a customer response in two ways:
- Click the "(+)" button labeled "Add client`s answer" within the editor, below the operator's text in the desired node.
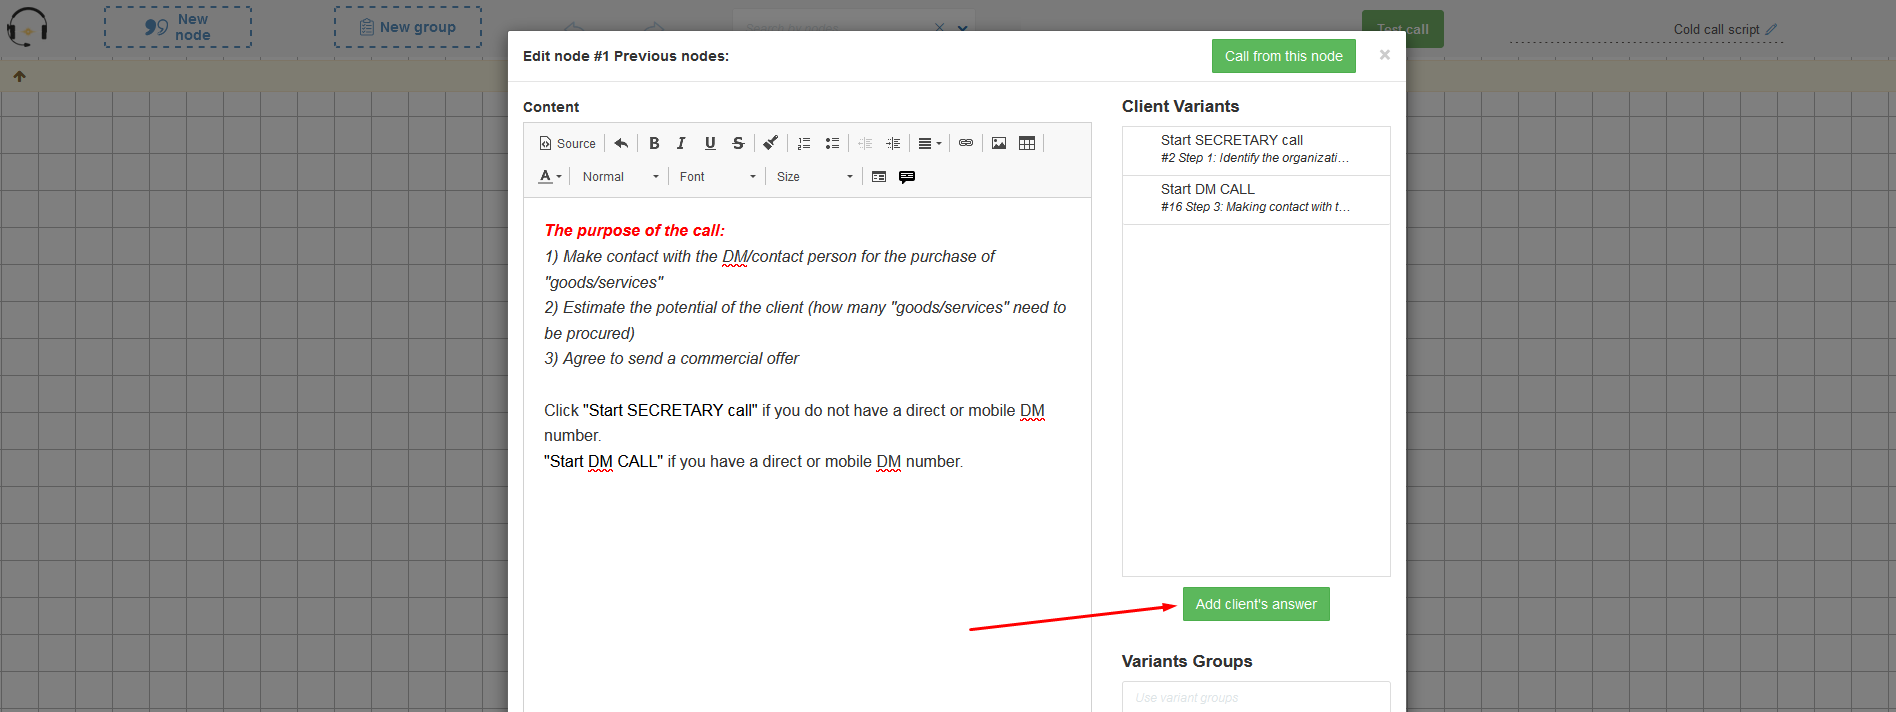 - Similarly, click the "(+)" button labeled "Add client`s answer" within the editor, below the operator's text in the desired node.

Within the modal window, provide the client's response and select the corresponding node or script. Click "Save" to add the response to the script editor, creating a connection between two nodes with a red arrow.

If you wish to specify the target node/script later, you can do so by dragging the red line from the center of the client response line to the desired node until it turns green, indicating a successful connection.
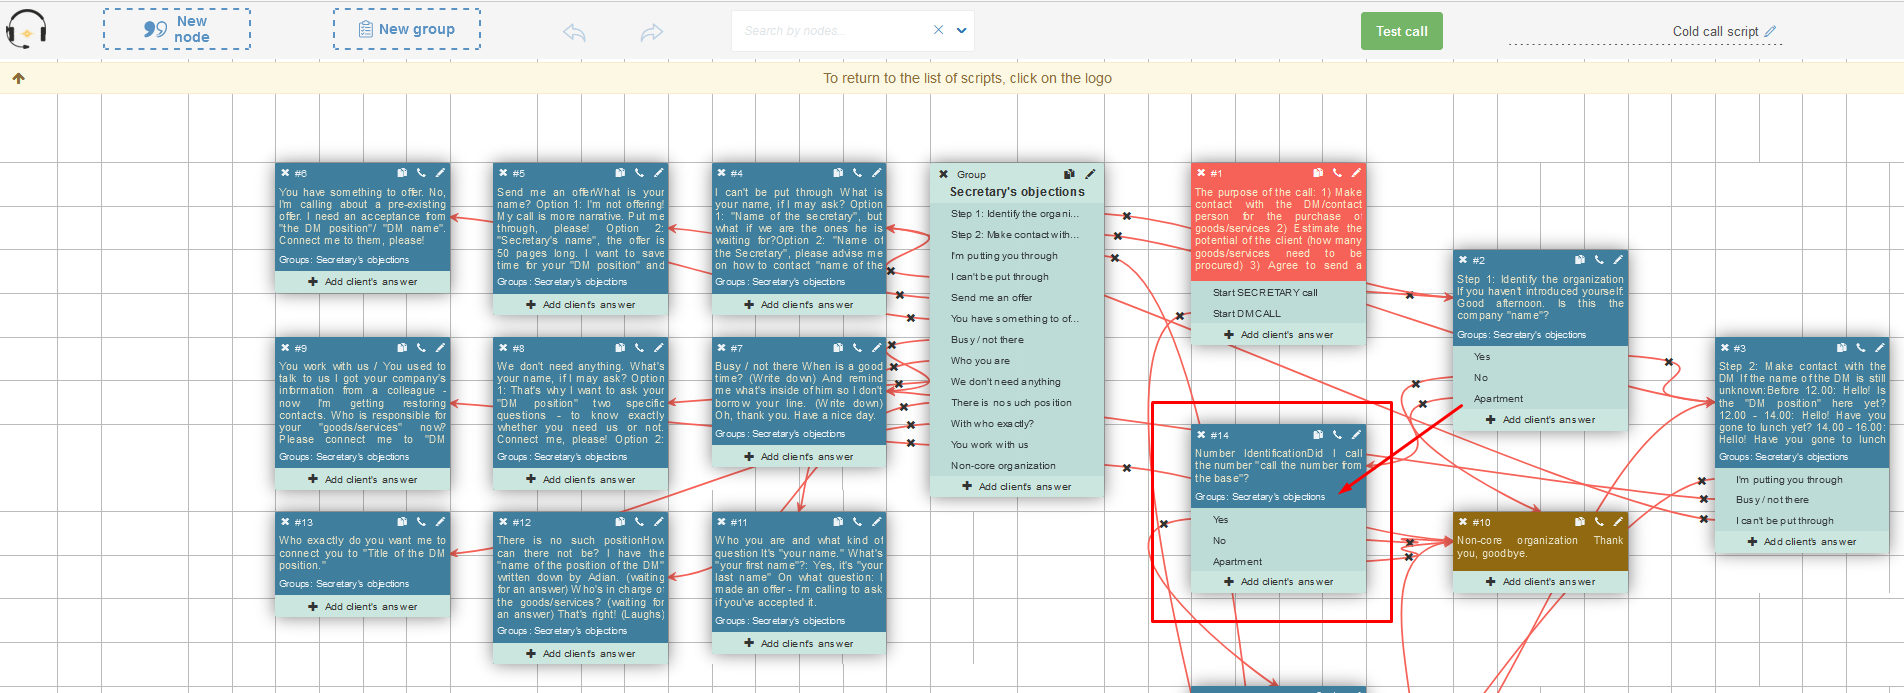
- You can remove the link between an answer and a node in two ways:
- Enter Response Editor mode by clicking the pencil icon next to the text in the editor.
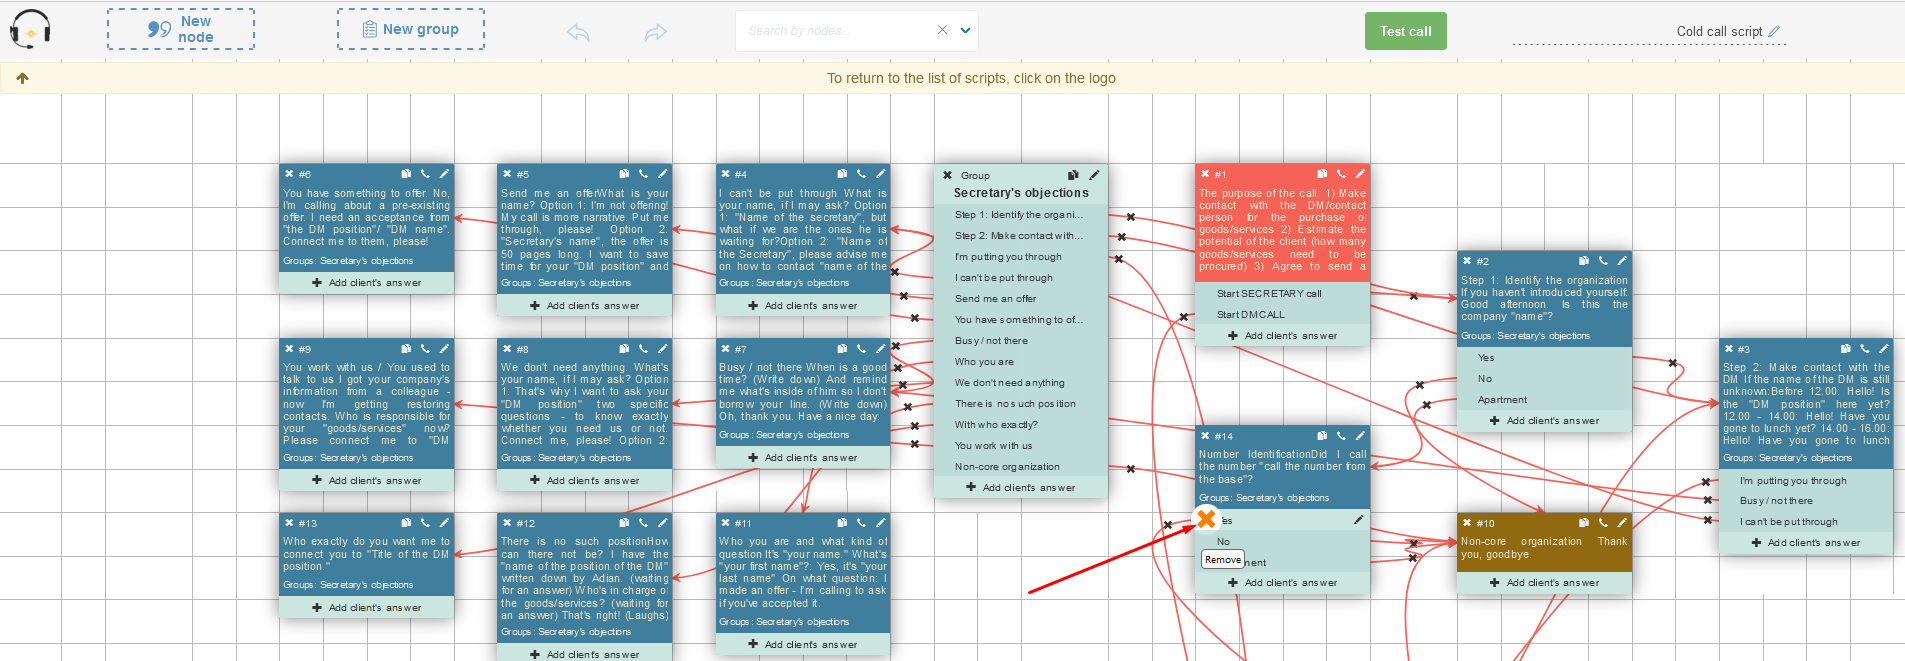
- Alternatively, directly within the script editor, click the black cross linking the answer to the node.
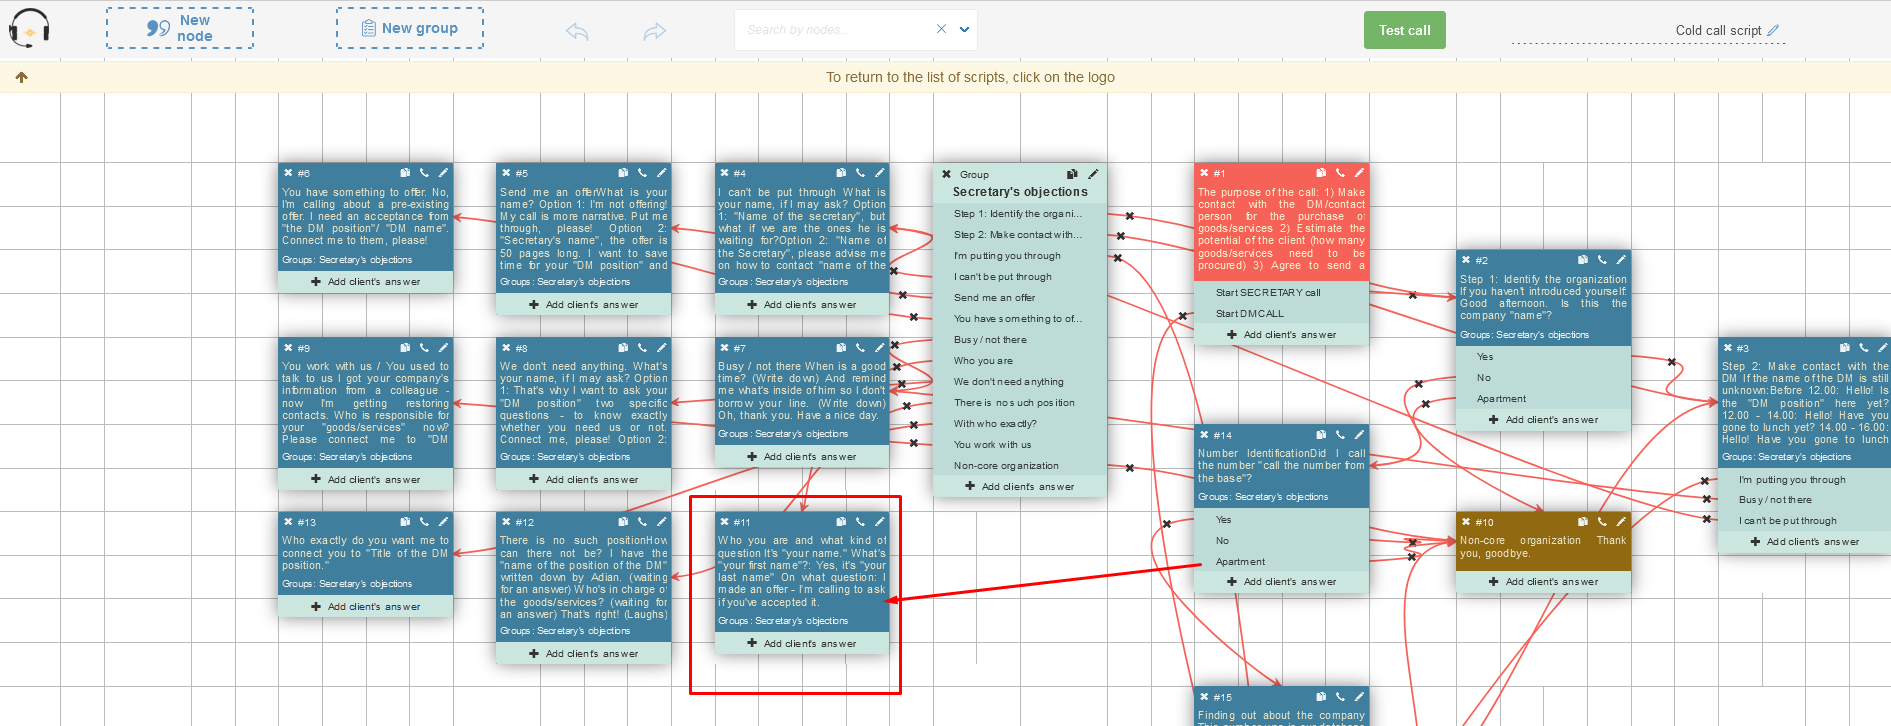
-
Response groups facilitate organizing responses heard during various stages of a conversation. You can create them by dragging the "New Group" label into the editor field. In the group's edit window, you can assign a name and add answers. If the "Use in all nodes" option is enabled, the response group will be applied to all nodes in the script.

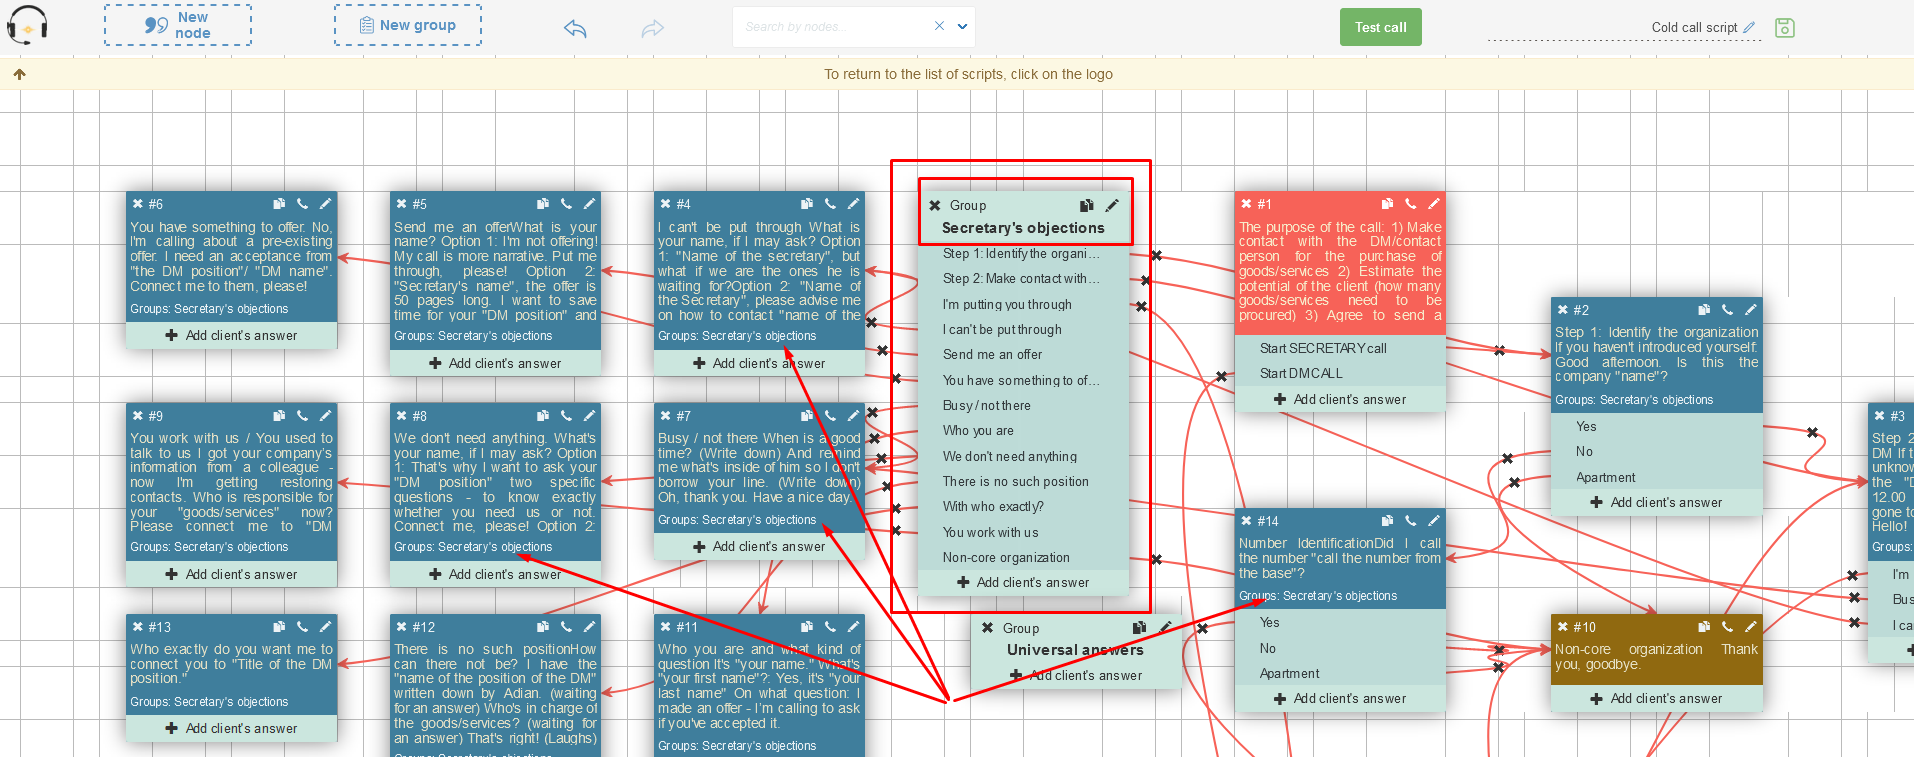
To link a group of answers to a node, edit the node and select the desired answer group. Then click "Save".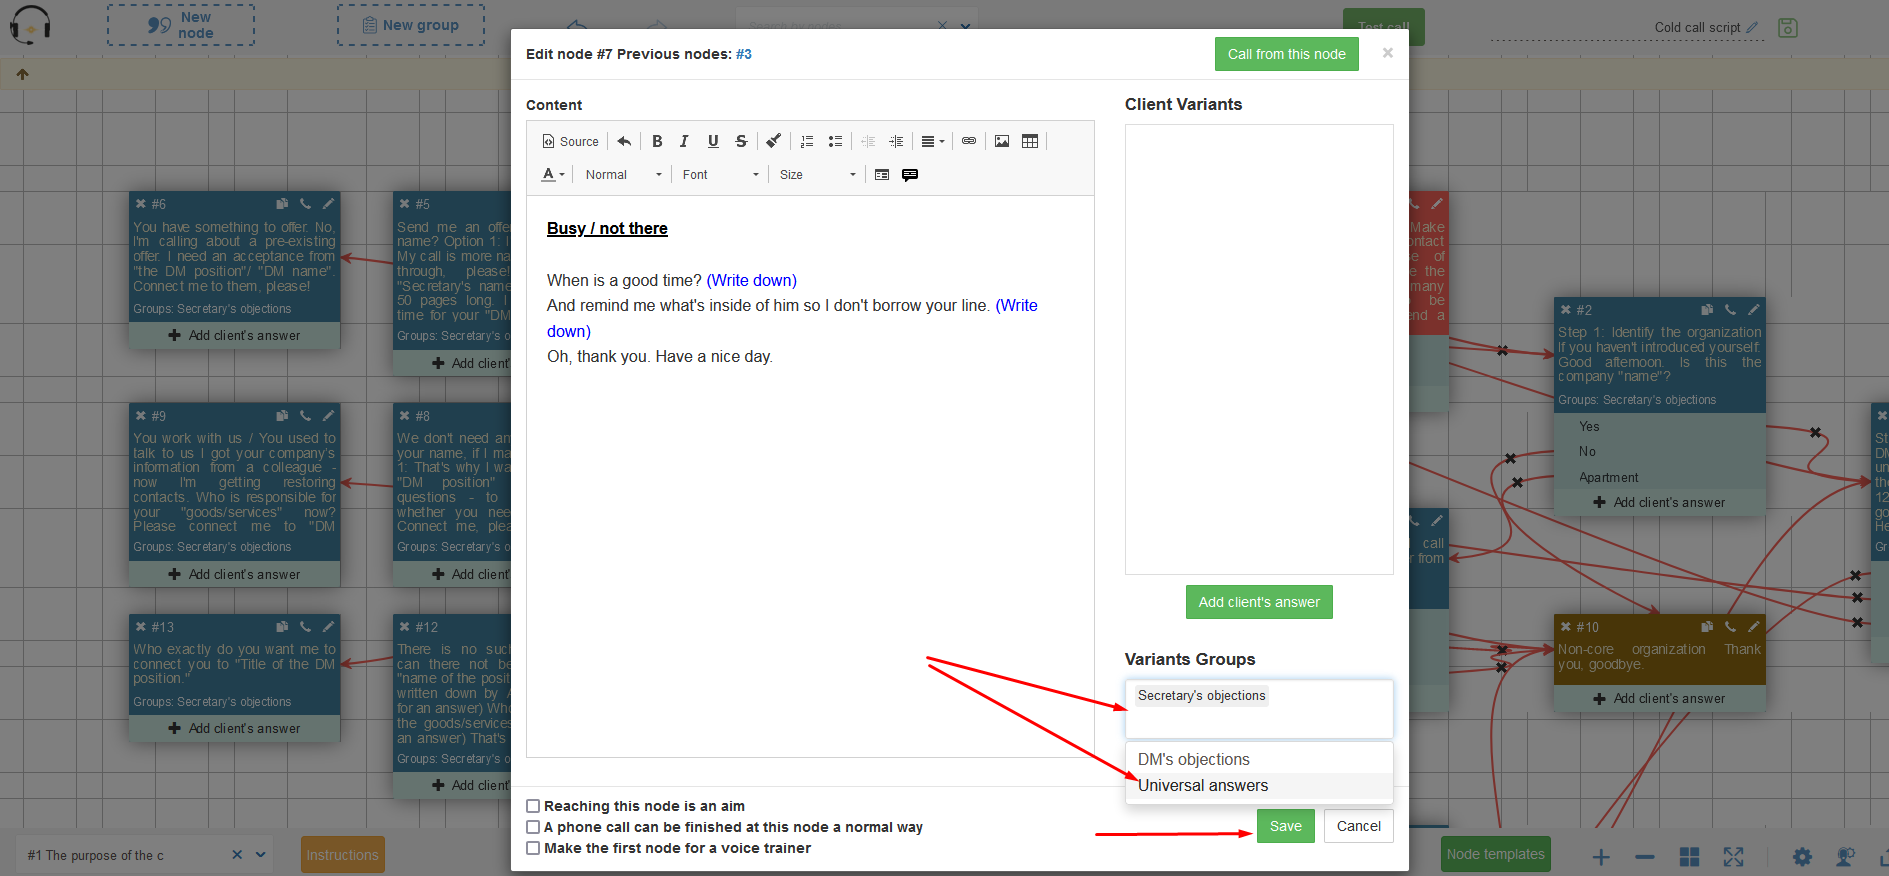
You can remove a group binding from a node by pressing the "Backspace" or "Delete" key.
-
To mark a node as the conclusion of a conversation, open the node for editing and select one of the following checkboxes to the left of the "Save" button:
- "Reaching this node is an aim" indicates successful completion of a specific goal, such as scheduling a meeting or sending a proposal.
- "A phone call can be finished at this node a normal way" denotes regular termination of a call without specific goal achievement.
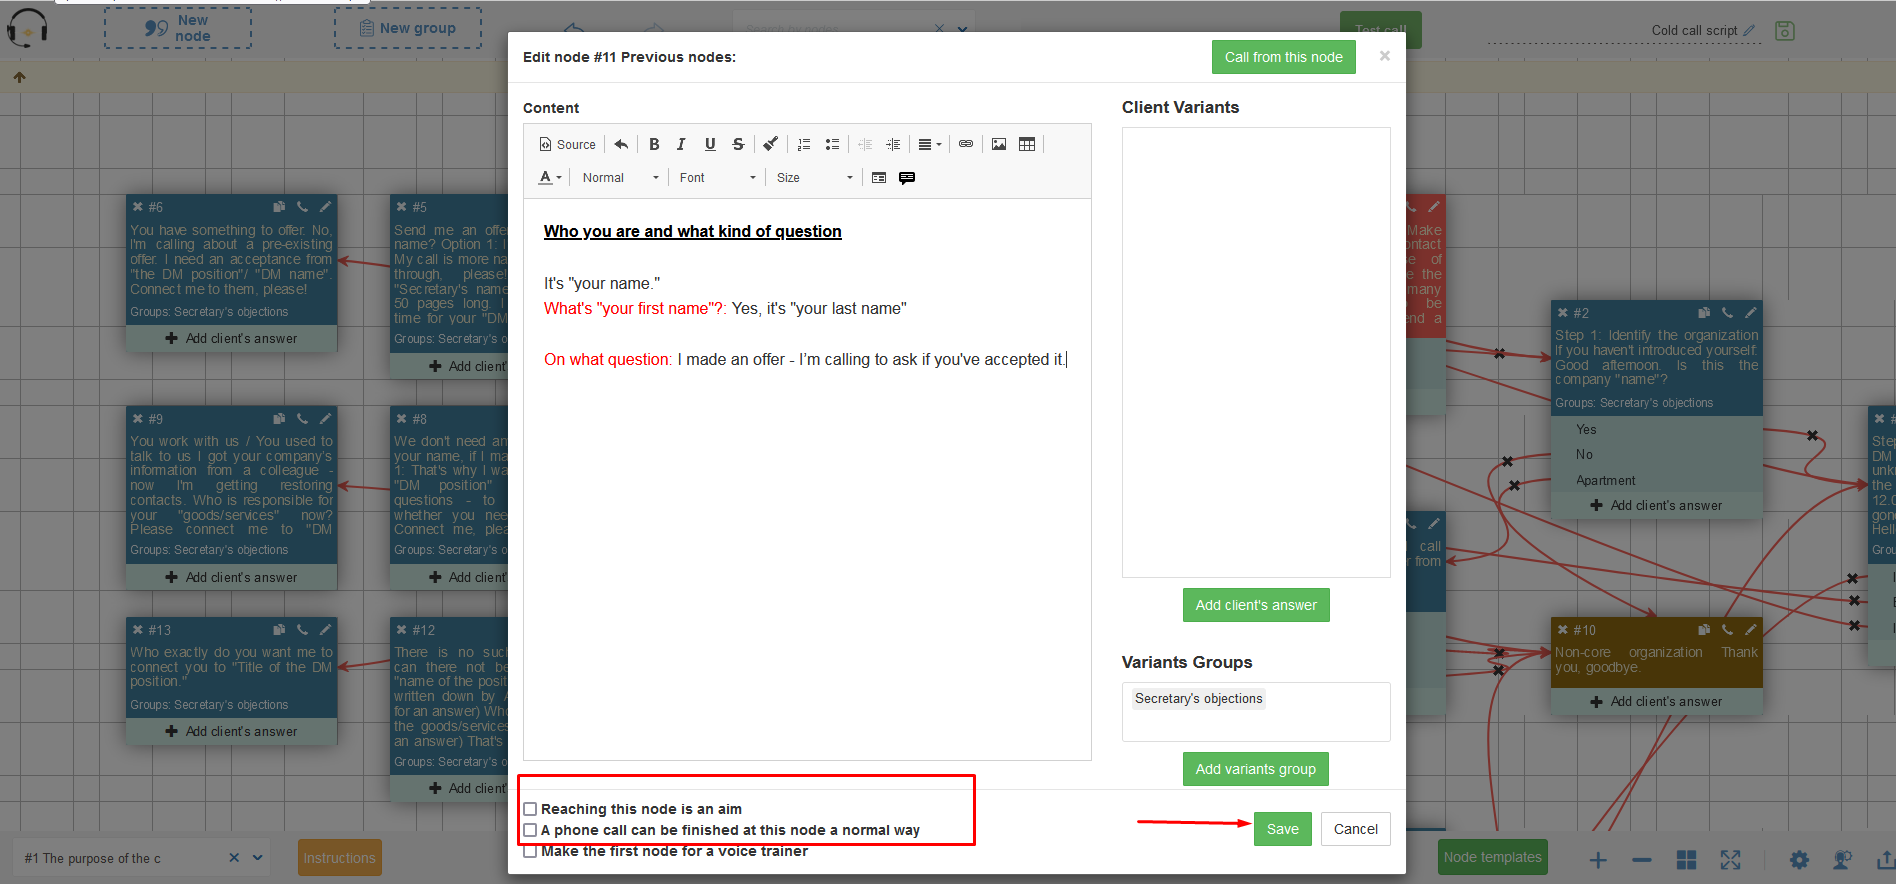
-
To preview the script's functionality, click the "Test call" button. In the ensuing window, click "Start call" to simulate how operators/sales managers will interact with the script. Click on customer response options to progress through the dialogue. Finally, click "Complete".

-
A "Call completed" window will appear, displaying call results - whether the script executed successfully, achieved its goal, or encountered errors. It also provides a field for operator comments.

How to insert fields into the script
-
Access your account, choose the script you wish to modify, and click the pencil button to enter script editing mode.

-
Open the node you want to edit. Position the cursor where you intend to insert the field (ensuring proper spacing for visual clarity), then click the "Insert Fields" button in the Node Editor.
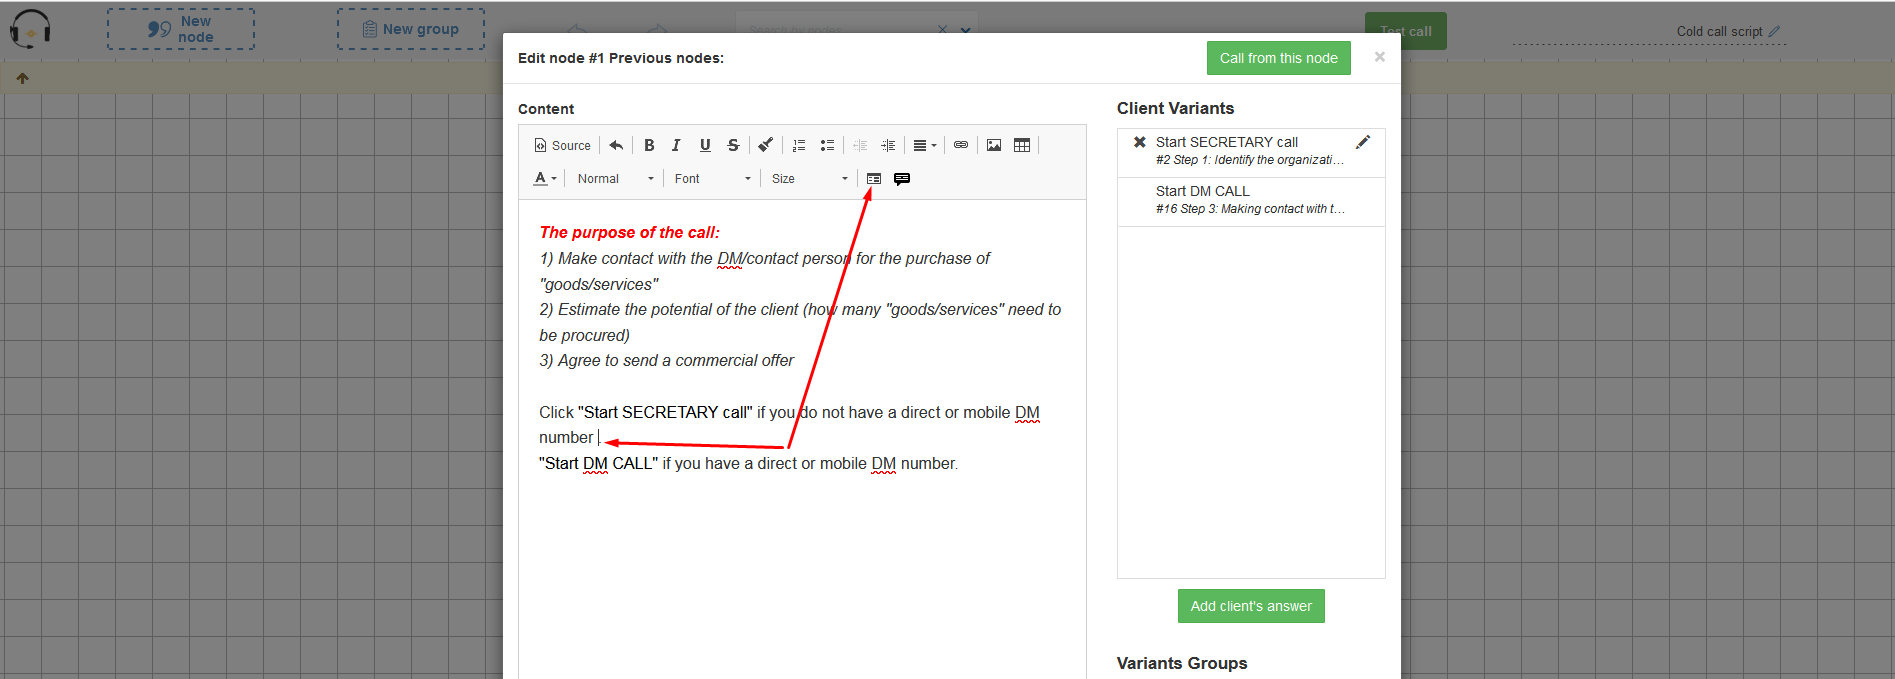
- A modal window will appear, presenting a list of custom fields. Choose the desired field to insert into the node.
-
The field is now integrated into the node, visible in call mode, and ready to be filled with data obtained by the operator from the client. Remember to save the changes made to the node.
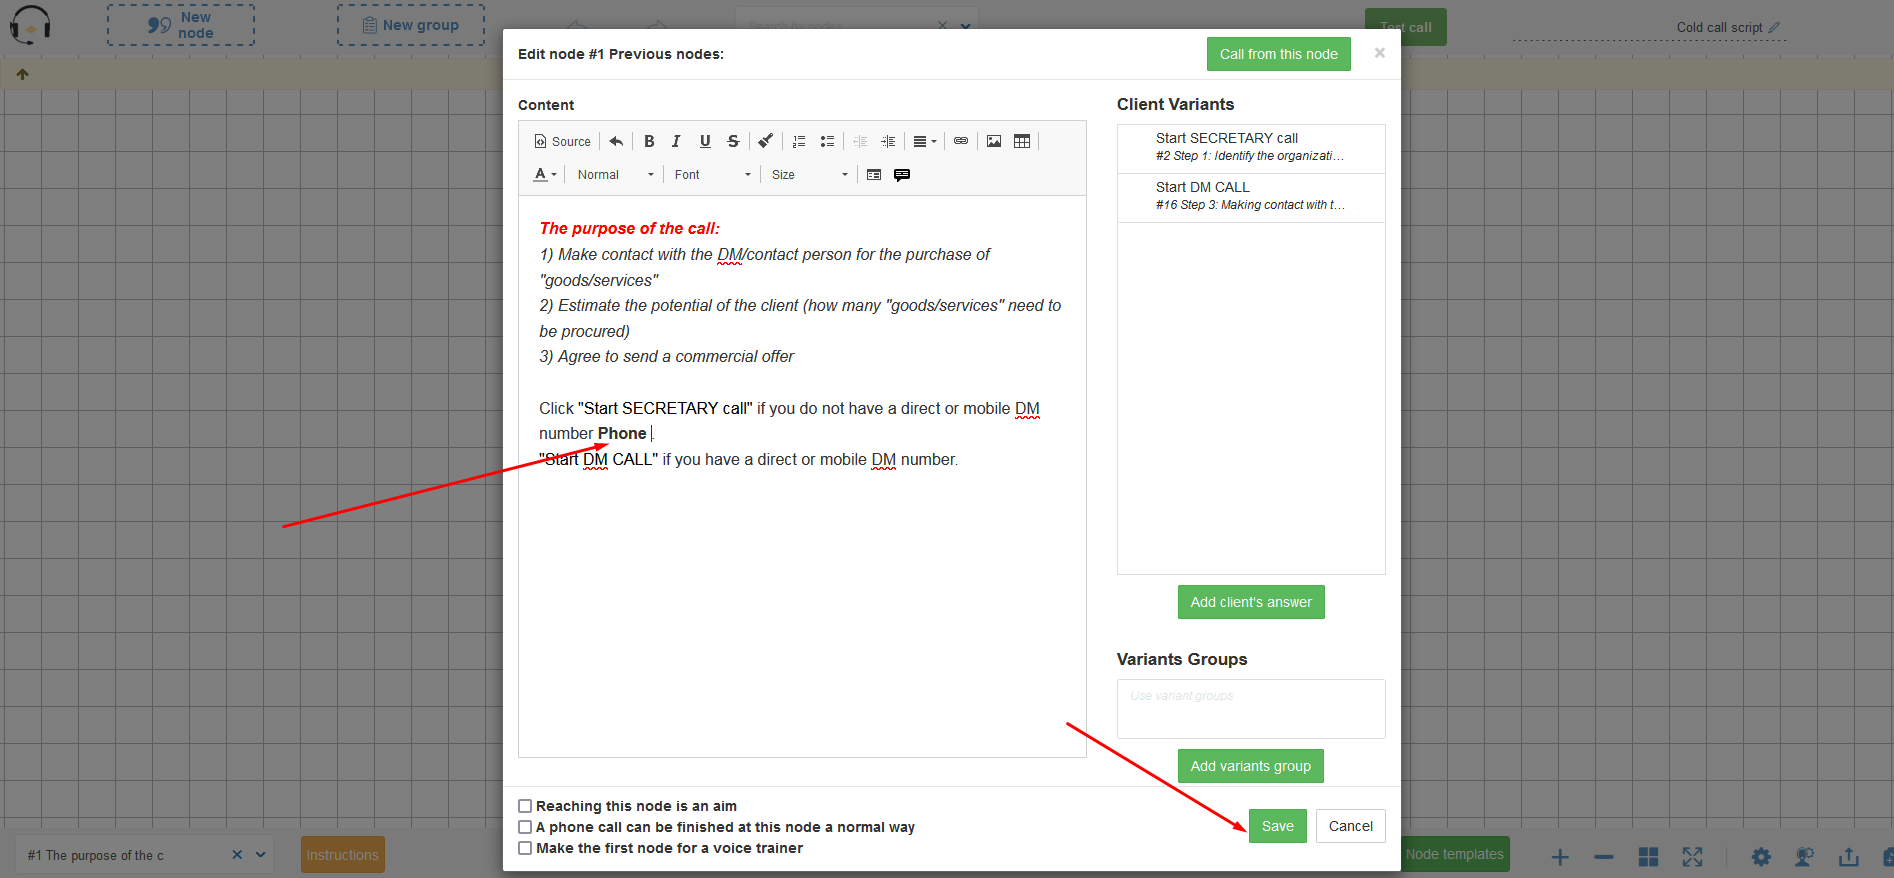
-
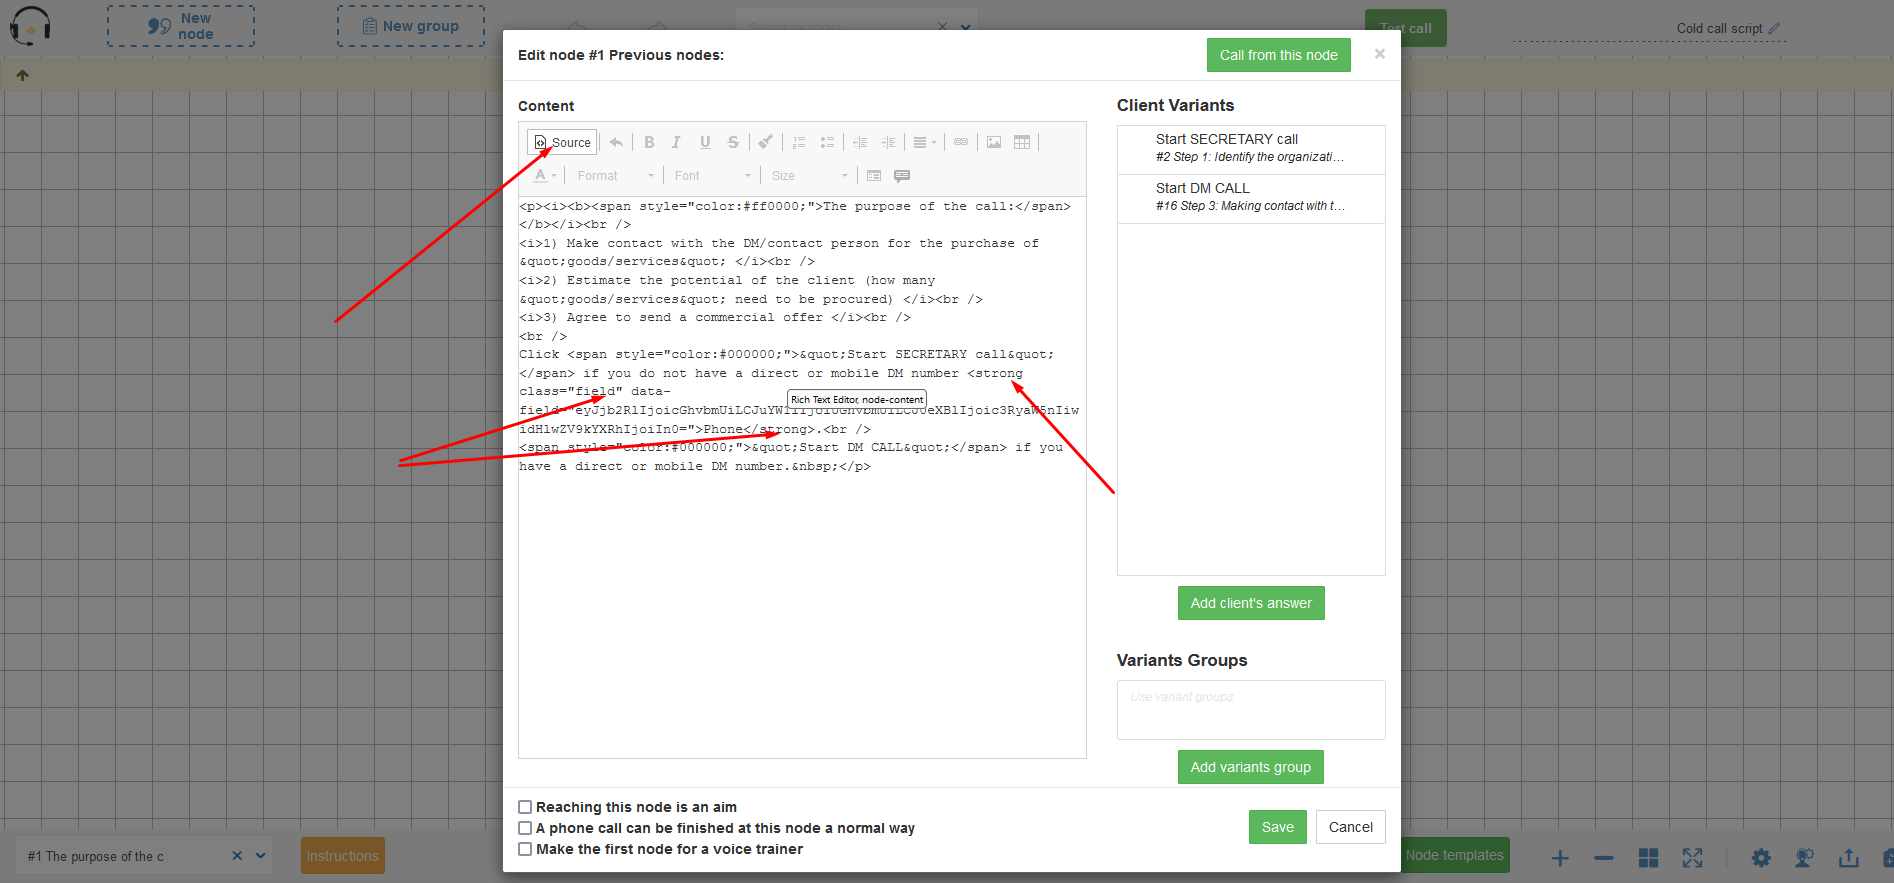
When inserting a field into the node editor, you're not merely adding text visible on the screen; you're incorporating code that will be transformed into the desired field during a call using the script. Thus, avoid inserting other words, phrases, or spaces inside the fields.
 To remove an inserted field, ensure complete selection, as even an extra space can disrupt the script's operation. Verify correct insertion/removal by clicking the code view button. An added field should be enclosed with "<strong class="field"> .... </strong>" tags; absence of this code indicates successful removal.

Script and call editor settings
-
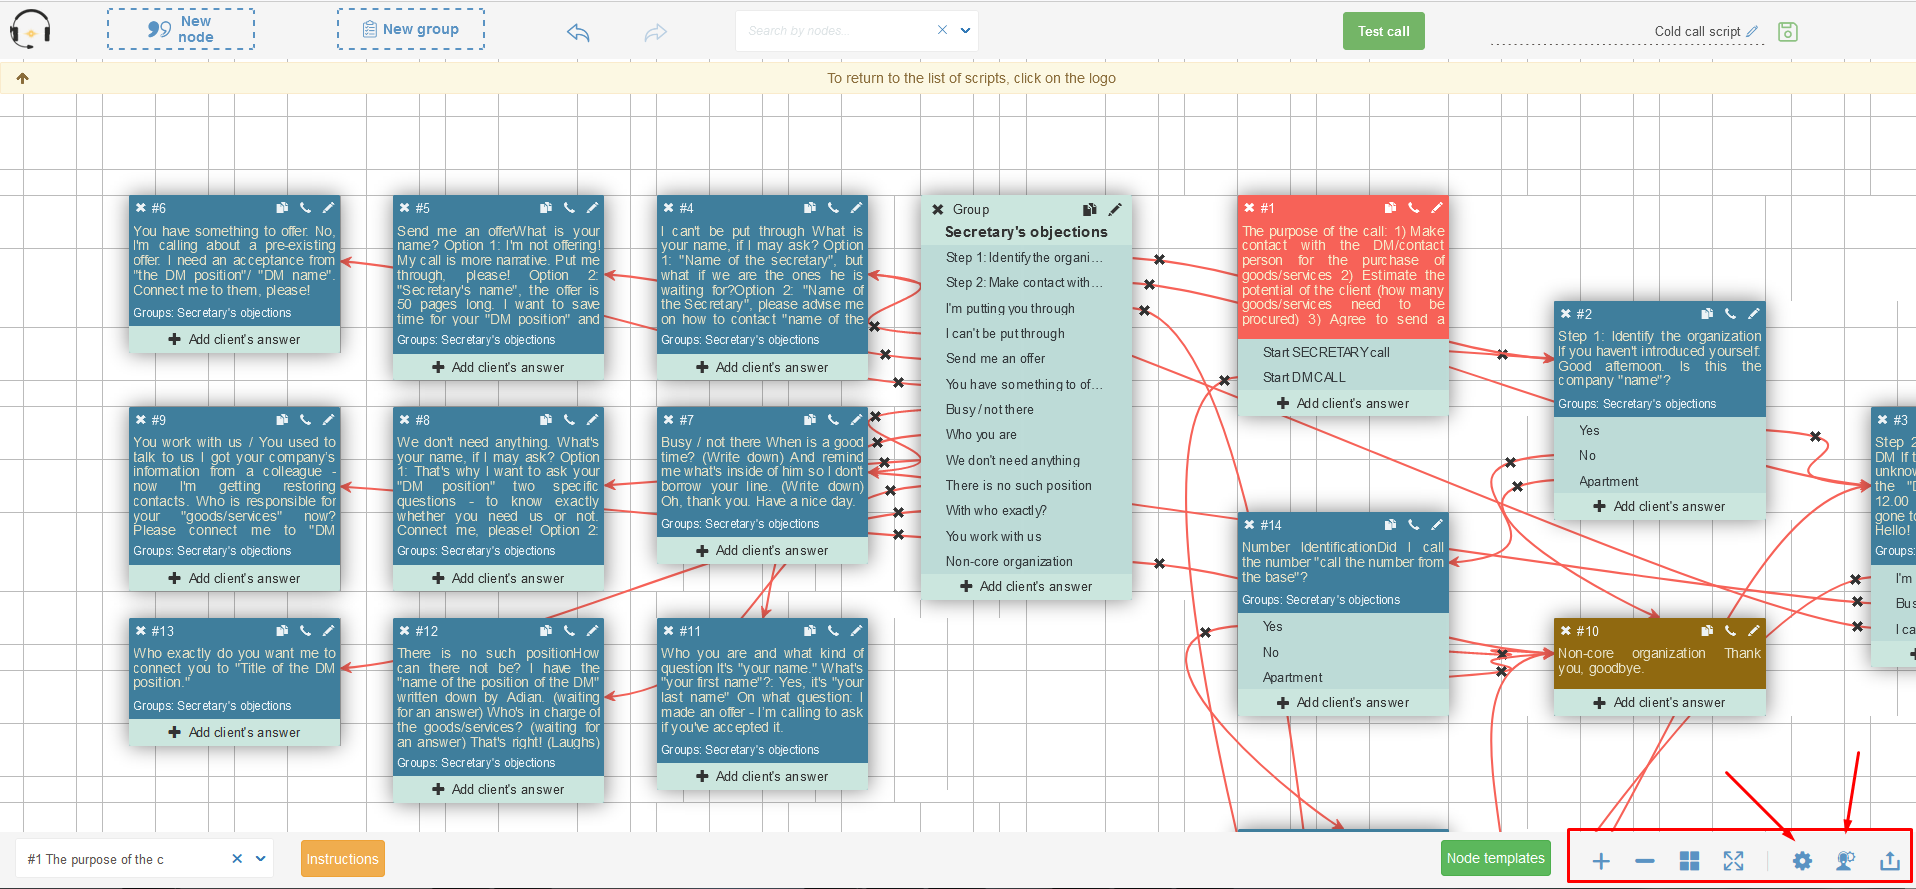
Navigate to the script's editor mode you wish to access. The primary settings for the editor and call mode are located in the lower right corner. Let's delve into these main settings: Editor mode, call mode, and publishing settings.
-
Clicking on the cog icon directs you to the Editor Settings menu, where you can configure various parameters that affect individual scripts or all scripts collectively: arrow style, maximum node text height, enabling fast page loading to omit drawing arrow links on extensive scripts in edit mode, thereby enhancing editor loading speed. Activating the "Use by default" checkbox applies these settings to all scripts where these characteristics remain unchanged.

-
When you select the icon depicting a person wearing an earpiece, you're directed to the call mode settings menu.
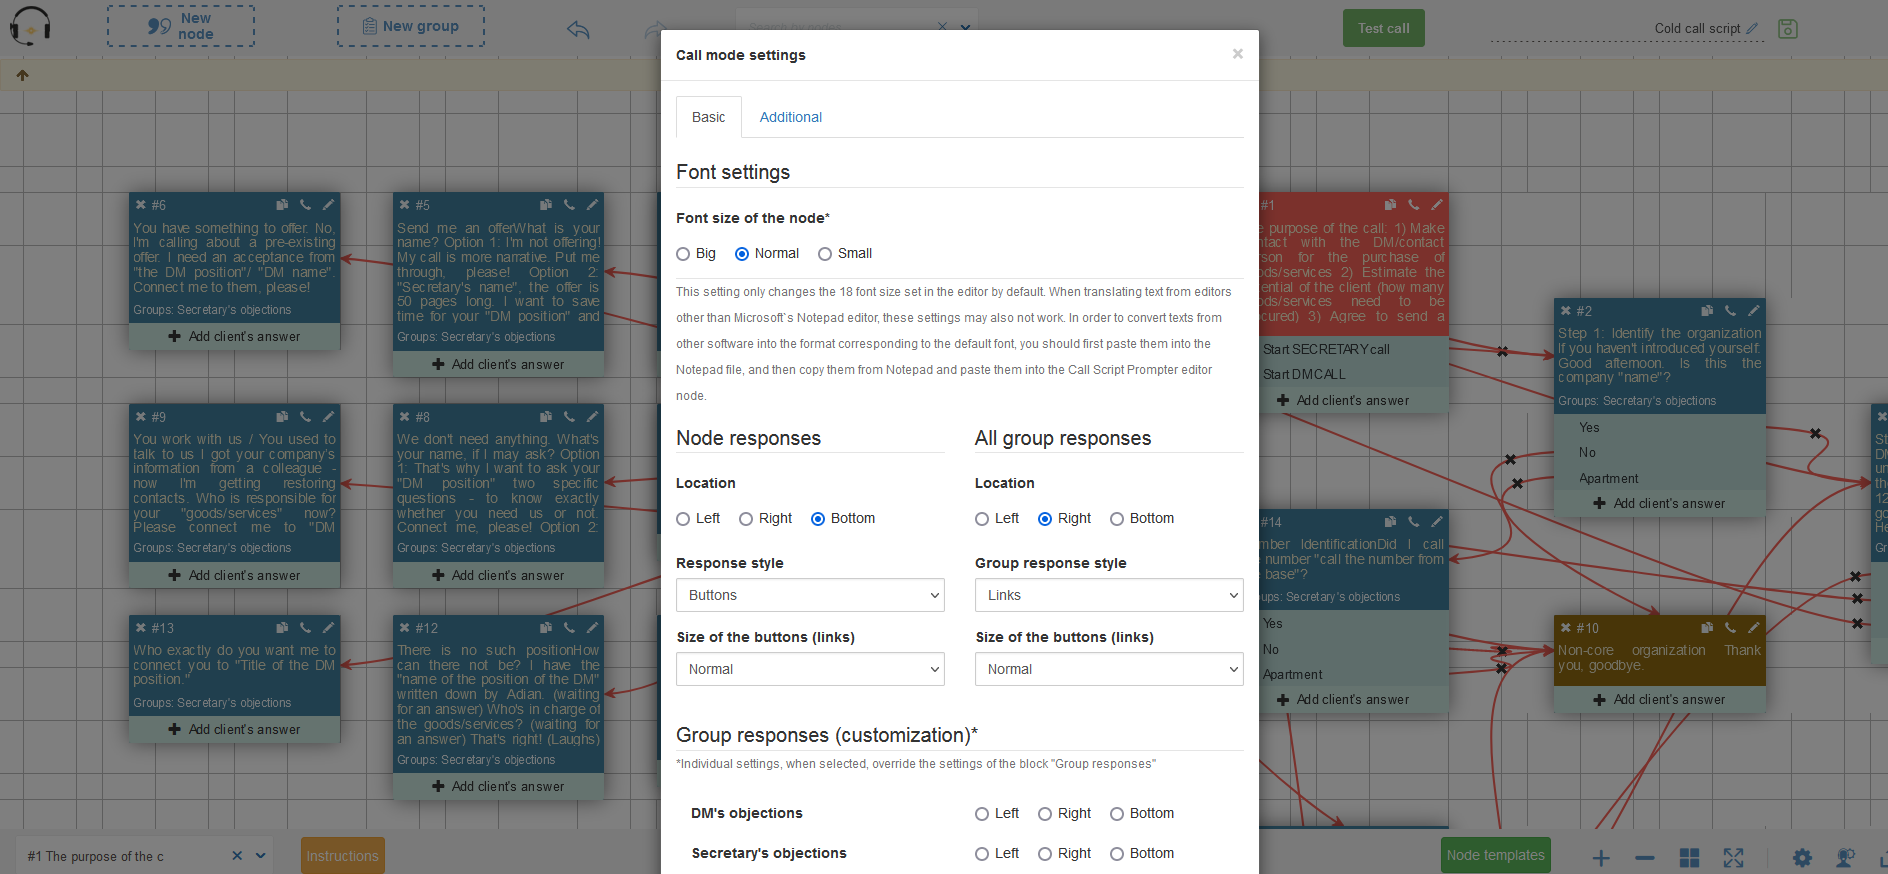 Within this menu, you can customize the font size of the node displayed during call mode, adjust the type, style, and positioning of linked answers associated with the node, and configure typical answer groups. Additionally, you can set instructional operator prompts on the call's start screen. Differing call groups can be finely adjusted, with groups featuring opposing answer values positioned on different sides of the node text during the call. In the "Advanced" tab, you have the option to reorder answer groups during the call by dragging them with your mouse.

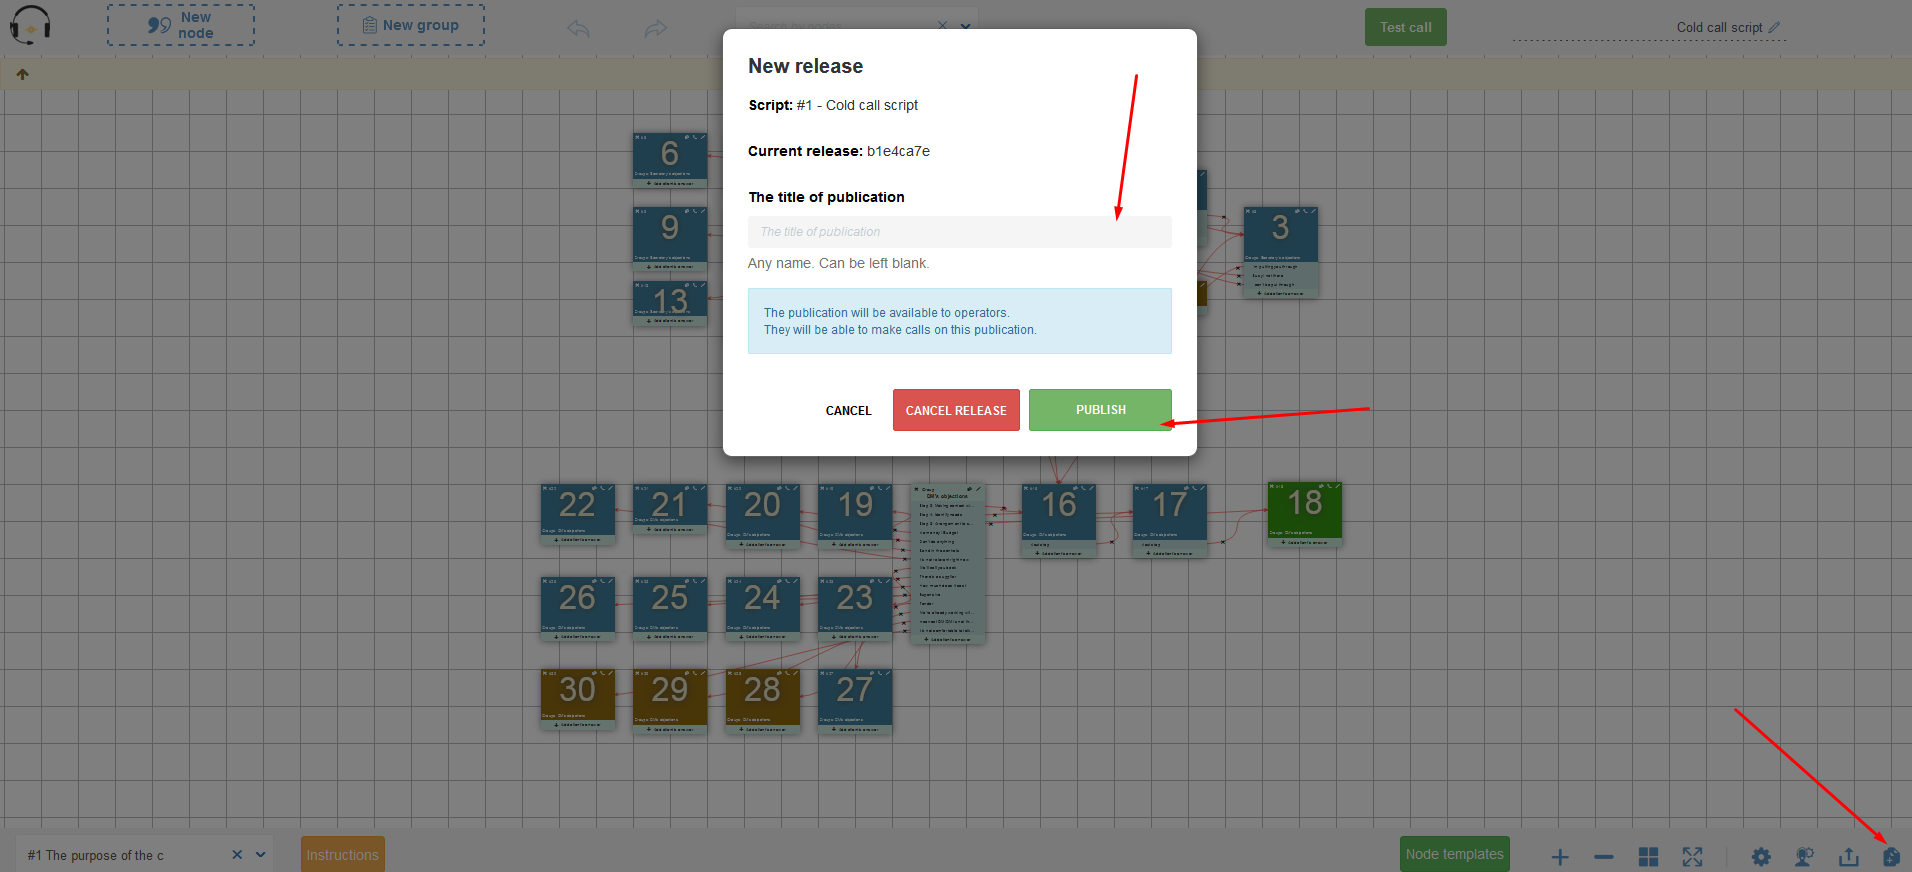
- If you've enabled the manual script publishing option in your personal account settings, you'll gain access to the "New Publication" script publishing mode - denoted by the last icon in the bottom right corner of the script editor.
 Enabling the "Publish scripts manually" option empowers supervisors or planners to edit the script, while allowing operators to access the most recent saved version of the script, ensuring consistency and preserving connections between various nodes and responses. Following the supervisor's publication of the script, operators can access the modified version.
Creating and Importing Custom Fields
How to create fields
- Custom fields streamline script management by storing client data gathered during operator interactions. Upon account creation, five default fields are generated, ready for insertion into your script's relevant nodes. To add or manage fields, navigate to your account and access Menu -> Fields.

- To initiate a new field, click the "Create" button.

- A modal window will prompt you to fill in the following details:
- "Field name" - a concise, descriptive label for the field, visible within the script node.
- "Code" - The field name translated into Latin letters, serving as a unique identifier within your account.
- "Field type" - Specifies how the field will display: string, number, checkbox (yes/no), list (single option selection), multilist (multiple option selection), date, time, date and time, or textarea.
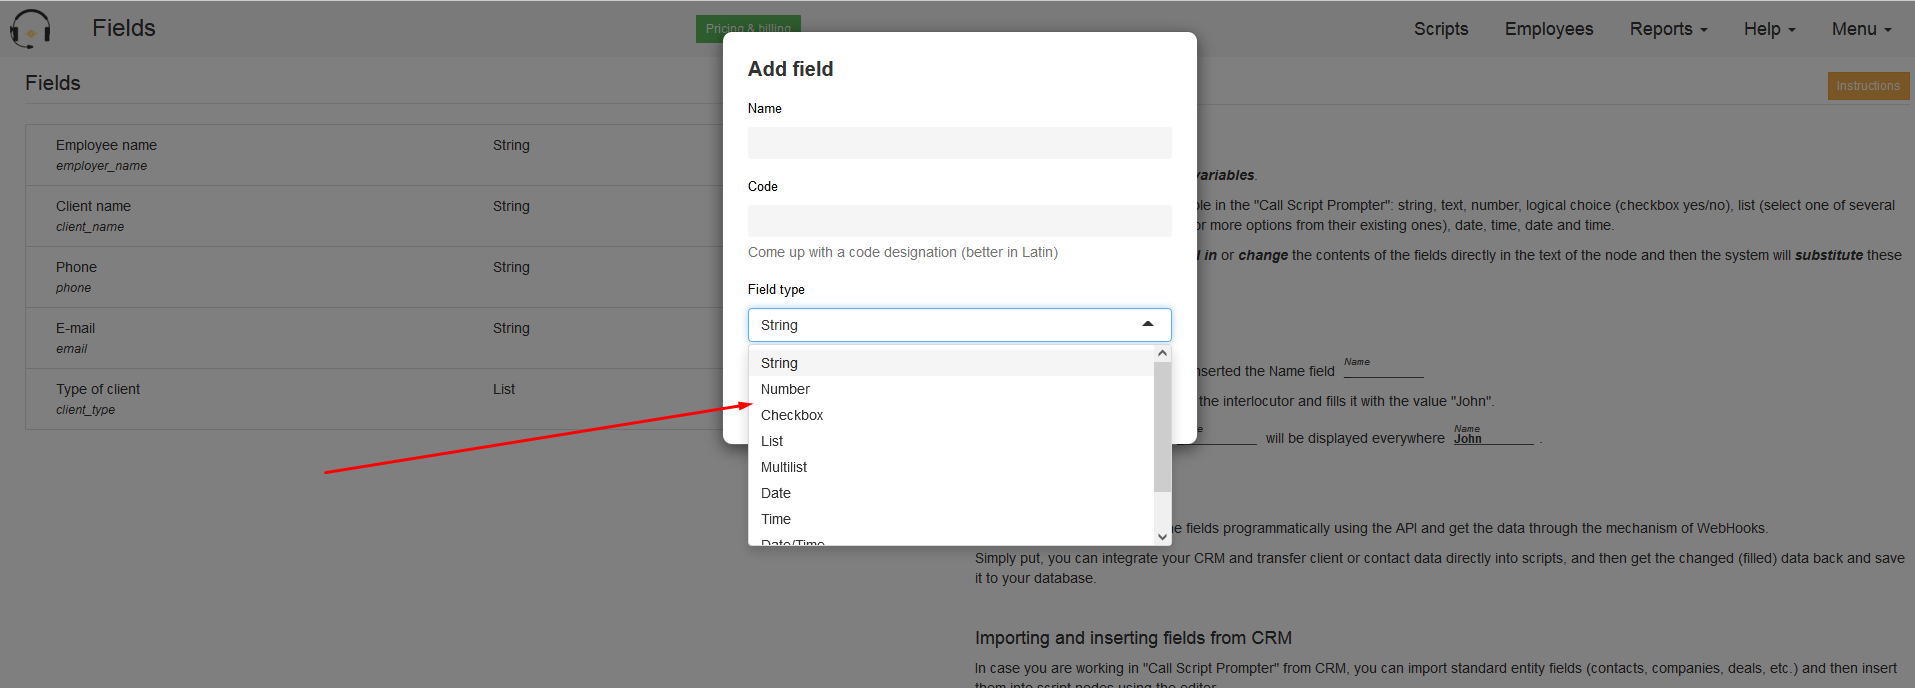
- If opting for the "List" or "Multilist" field type, provide the options operators will utilize during calls, separated by commas.
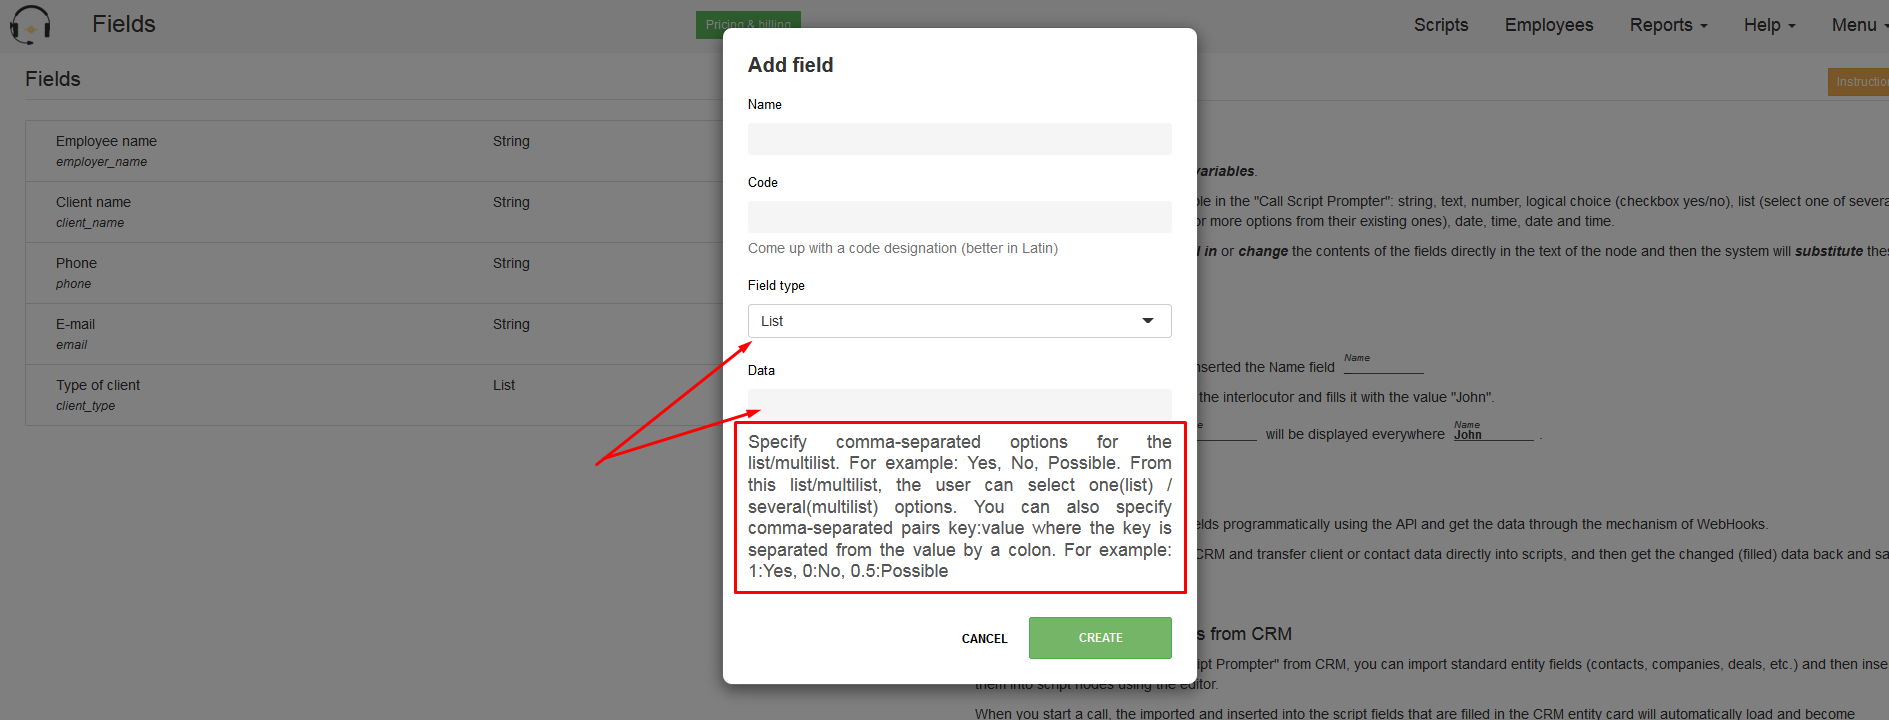
- Once all details are entered, click "Create" to finalize the new field, which will then appear at the top of the fields list.
Creating standard phrases and adding them to the script
How to create and use standard phrases in scripts
- The purpose of standard phrases is to streamline the tasks of scriptwriters and account managers by allowing them to reuse phrases across different scripts. By creating standard phrases, a manager can avoid the repetition of entering the same text multiple times in various scripts. To add a standard phrase, users need to log in to their account and navigate to Menu -> Standard Phrases.

- To generate a new phrase, users should click the "Add Phrase" button.

- A modal window will appear where users can input the phrase text.

- After inputting the data, users should click the "Create" button. The new phrase will be generated and displayed at the top of the phrase list. A similar modal window for adding phrases will also be accessible directly from the node editor.

- Users can edit or delete any standard phrase at any time. Nodes where phrases have already been inserted will remain unaffected since they are inserted independently of the original phrase.

- To insert a phrase into the text within the node editor, users should click on the icon for standard phrase functionality. A modal window will open displaying a list of all standard phrases. Users can then select the desired phrase from the list and click on its text. When inserting phrases in the node editor, the standard phrase will be added at the cursor's location.

This tool significantly simplifies the process of creating and editing scripts, offering convenience and efficiency in work.
Work in the CRM
Working in call mode
How to make a script call


How to fill in the fields in a call
-
To input data into the fields during a call, navigate to the relevant node containing the fields and proceed to fill them out. For text or numeric fields, enter the data via the keyboard. For checkbox, list/multilist, or date/time type fields, specify or select the desired values.


-
If you are working within a CRM system, certain CRMs (e.g., Bitrix) will automatically update the values of entity fields (such as contacts, deals, companies, etc.) from which you make calls. In other CRMs (like AMO), the entity fields in the CRM card will only update at the conclusion of the call upon clicking the "Save" button.

-
If a field appears across multiple nodes during the call, filling it out once will display the value of that field in all relevant nodes. Should you need to adjust the value of this field during the call, you may do so. The list of completed fields can be viewed in the Reports -> Calls menu based on call results.

Working with reports
Scripts report
This report is a summary and is a table with a list of all scripts and analysis of past conversations on these scripts
 You can generate a report more flexibly by selecting a script, an employee, period of work with the script, as well as goal achievement parameters and script quality control. Fine-tuning allows you to better evaluate the work of employees.
If you click on the figures inside the table, you will go to the call report.
Call report
Report on calls is very important in terms of monitoring the effectiveness of employee conversations. It is a complete list of all calls on the script you and your employees, recording the results of calls, comments and fields filled during the communication with the client, if they are in the script.
You can generate a report using filters (fine-tuning): employees, call period, and other indicators to generate a report.
If you need to save data for further analysis and communication with employees, you can generate a report and export it to Excel.
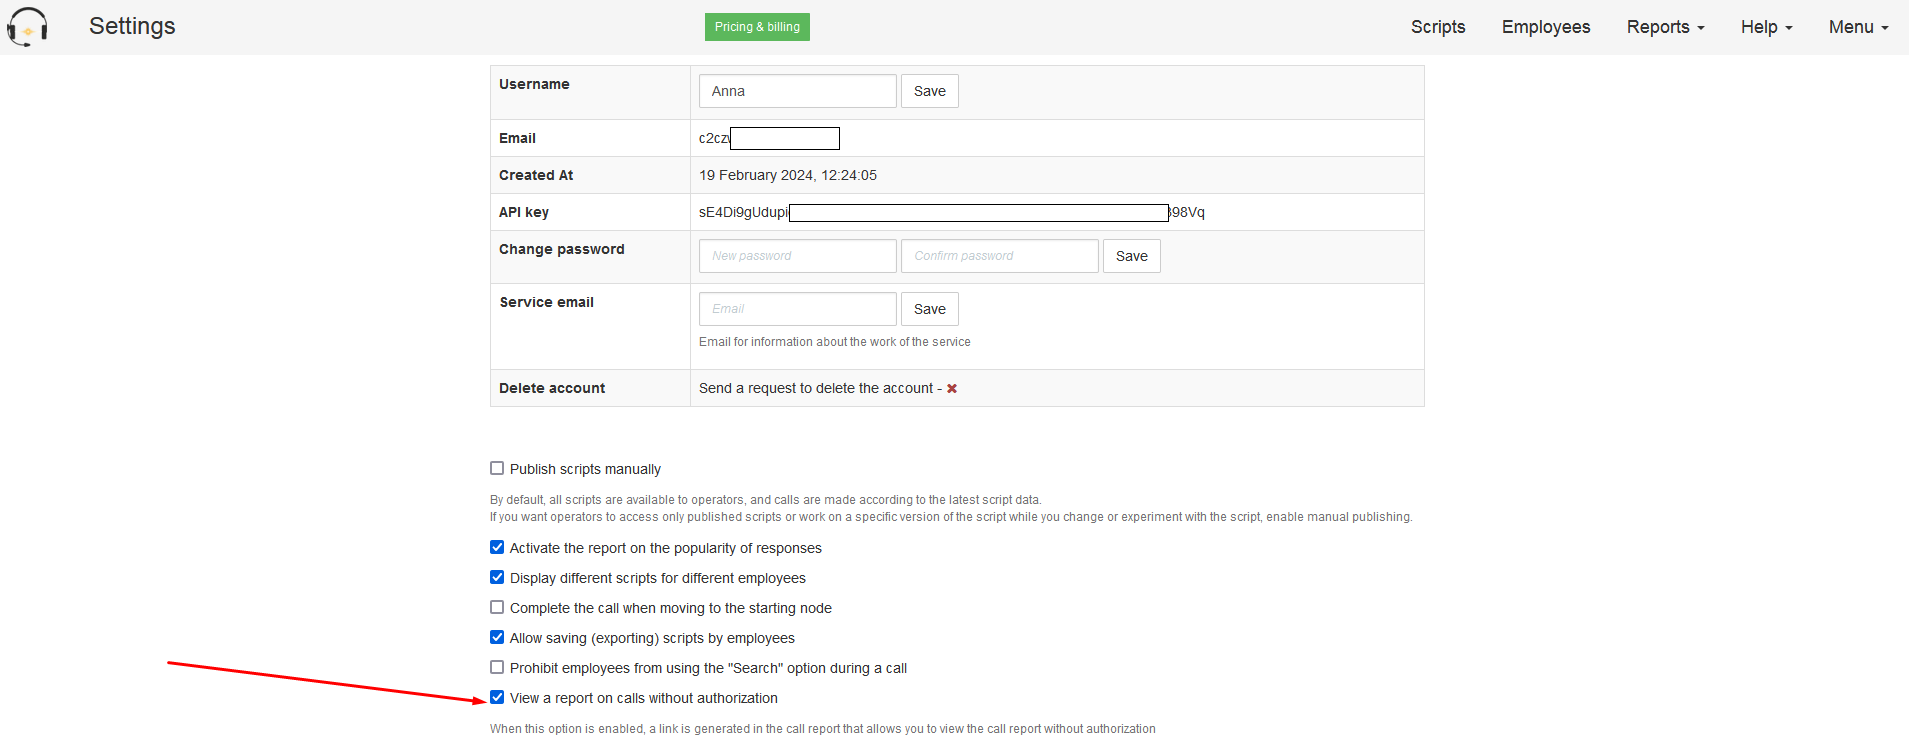
In the event that you want to be able to view reports without authorization in the service (for example, allow employees of other departments or subordinates to view reports on their own), you can enable the "View call report without authorization" option in your personal account settings.
If you enable this option, a link to view the report without authorization will appear in the call report.
Copy the link, save it and send it to those persons to whom you consider it necessary. They will be able to view the report in a summary form, as well as for each call separately, but they will not be able to go into script editing mode and change anything in it.
Let's analyze the meaning of the block of icons in the line to the right of each call.
- The "eye" icon allows you to view each employee's call in detail, indicating the nodes passed and the answer choices used.
- The "pencil" icon allows you to go to the editor of the script on which the call was made.
- The icon with the image of a "paper clip" is visible if the call was from the CRM and it leads to the entity card (client, company, deal, etc.), from which the call was made.
Performance Report
The productivity report provides insight into the comparative performance and effectiveness of employees during any specified timeframe.
You have the option to generate either an overall report or one specifically tailored to a particular script and time frame. This feature enables you to evaluate your employees' performance, thus enabling you to incentivize and provide targeted training to those who demonstrate particular outcomes.
Working with the voice trainer
What a voice trainer is for and how to work with it
The voice trainer feature in the "Call Script Prompter" sales script builder enables your managers to practice the script while interacting with the virtual assistant. It helps them learn to adhere strictly to the script during actual client calls.
- Commence training in the voice simulator mode exclusively via the Google Chrome browser. Sign in to your account, select the script you wish to use for training from the list. Before initiating training, familiarize yourself with the guidelines for configuring the script for the voice simulator. Besides adhering to the instructions provided, ensure that the training script remains straightforward. Avoid incorporating numerous nodes and response groups; instead, keep the script clear and simple. This approach facilitates swift system operation and enables managers to quickly acclimate to the new tool, responding proficiently using the script.

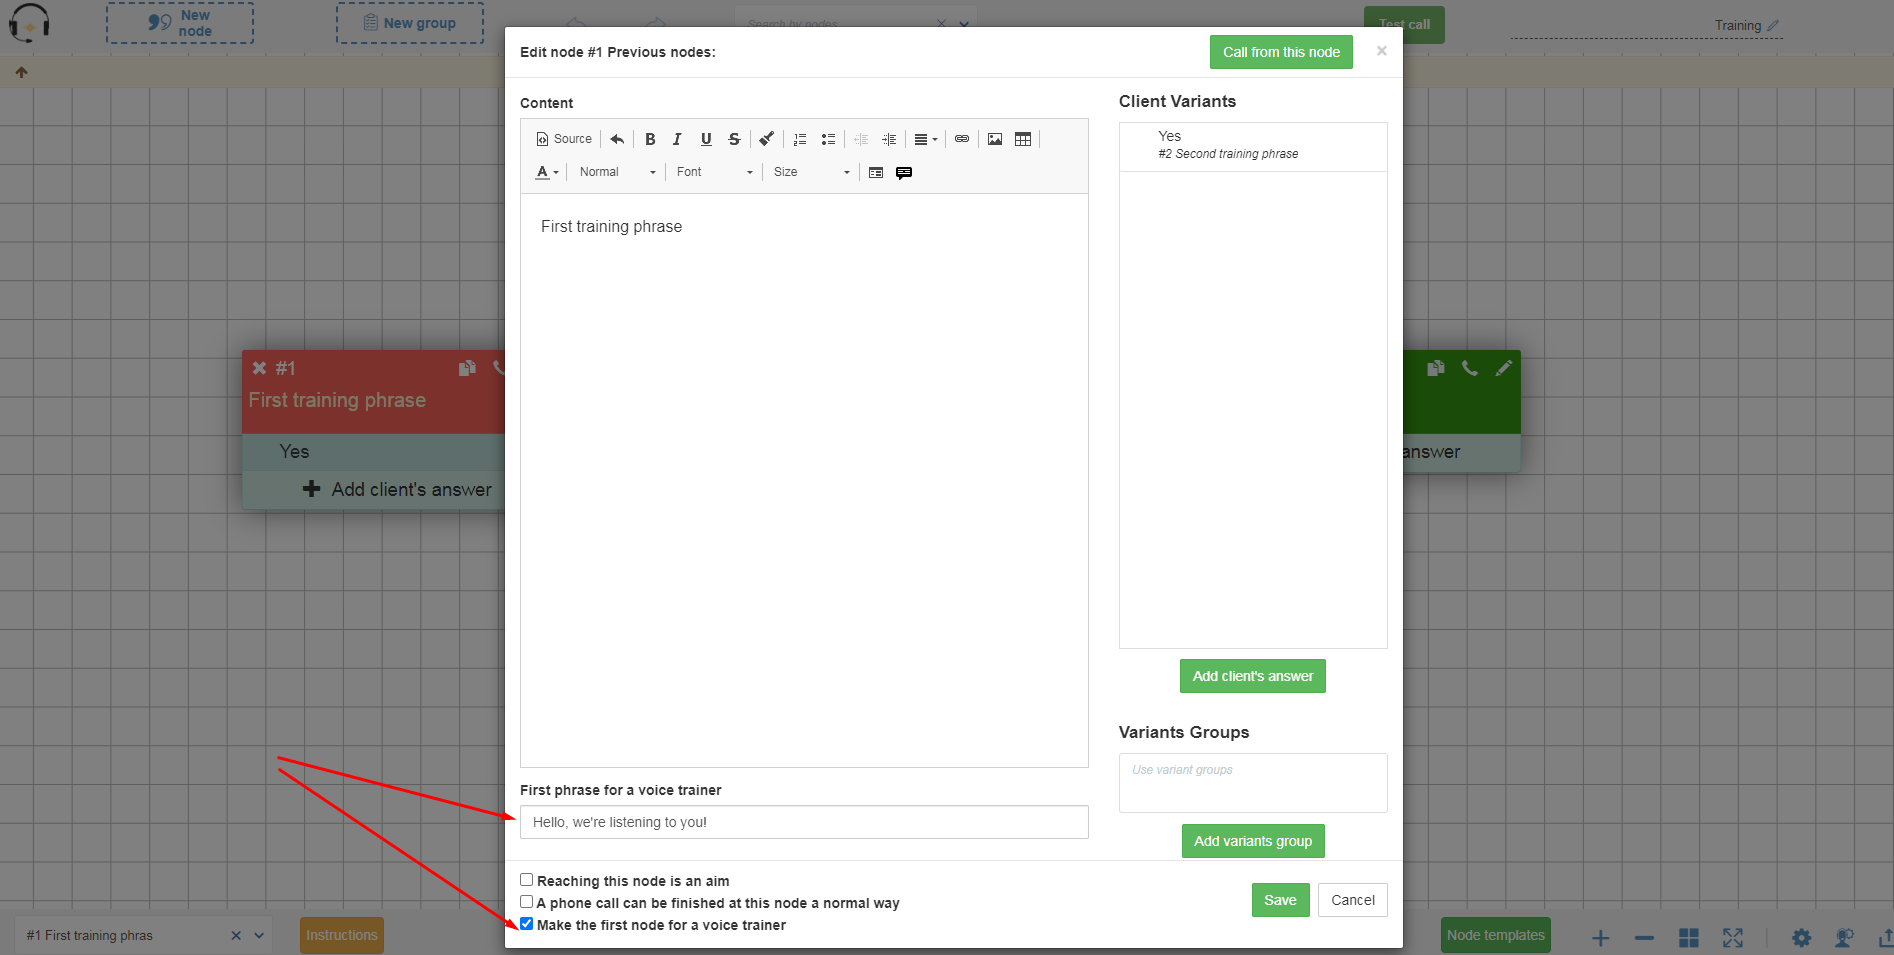
- Prior to commencing training, configure the script. Access the script editor and select the node from which you intend to initiate training for editing. Check the box labeled "Set as the first node for the voice trainer" and input a greeting phrase that simulates the conversation partner with whom the dialogue will take place. Save your modifications.
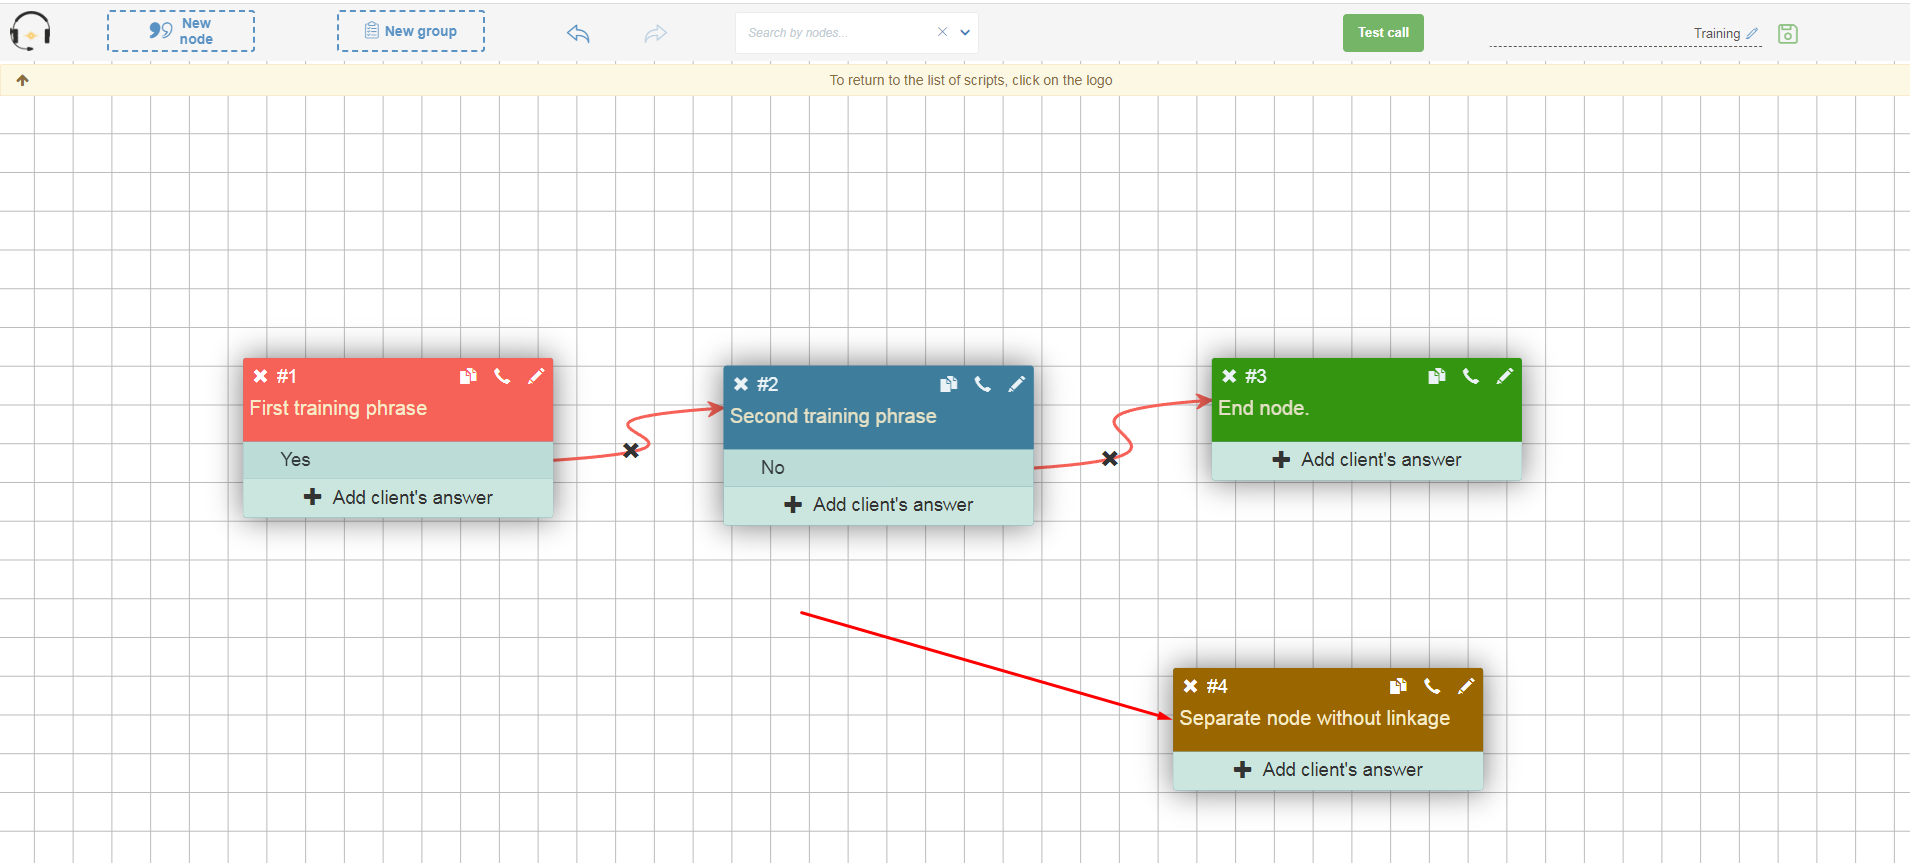
- Ensure that the script includes end nodes (displayed in green or brown) with corresponding response options. Nodes such as 4, lacking a pathway leading to the dialog end option, will trigger an error when initiating training.
- In case you overlook specifying the start node and greeting phrase beforehand, or omit the end node signifying successful call completion, the system will prompt you to provide this information upon initiating training.


- Upon completing preparatory tasks, initiate training by clicking the "dumbbell" button to commence scripted training.
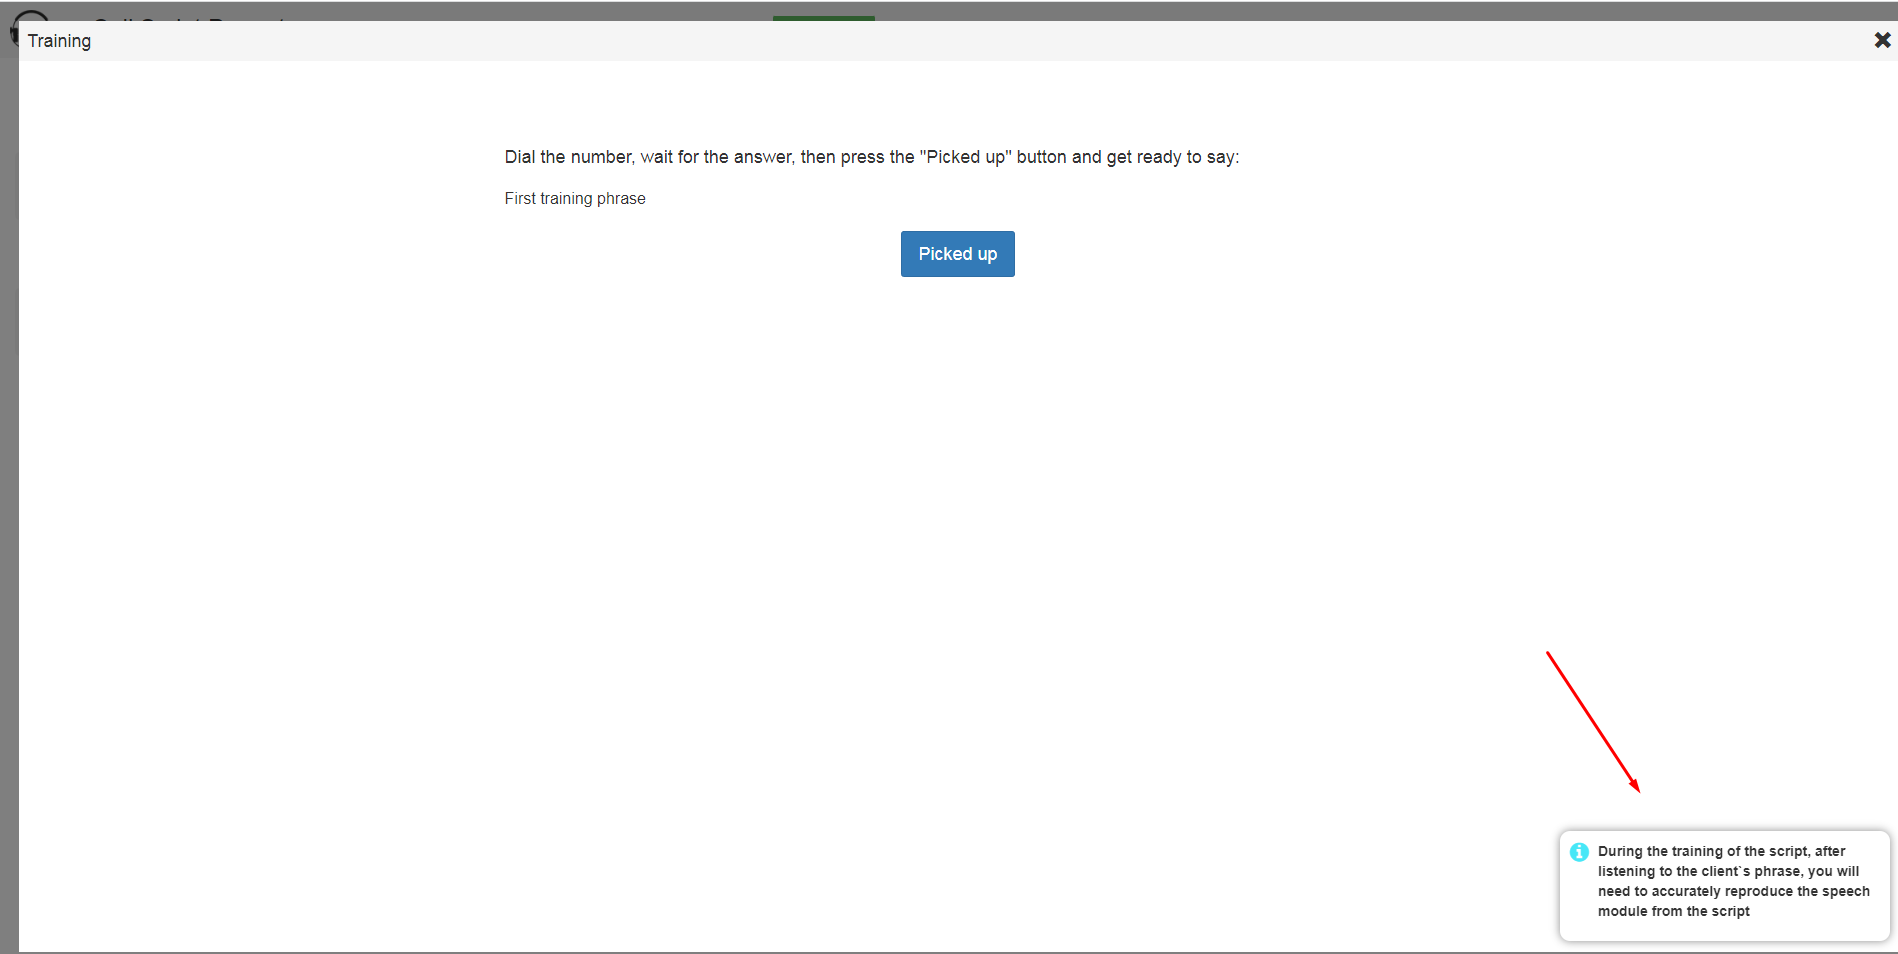
- If the system fails to recognize the phrase uttered by the operator after three attempts, a warning message will appear.

- Upon reaching the final node, either by yourself or an employee, the system will notify you of successful completion of the training.

Work with employees
How to add employees
Option 1 - by adding one employee.
-
Access your account and proceed to the "Employees" section. Choose the type of employee you wish to invite and then click on the "Invite..." option.

- Complete the required fields in the form and then select "Invite".

- Upon sending the invitation, the system will notify you, and the employee will be listed with the status "Invitation sent".

- Once the employee receives the email, they should follow the link to complete registration within the service. After filling in the required fields, they must click on "Complete Registration".

- If the employee didn't receive the invitation email for registration, you can manually send them the invitation link via email, Skype, or any other method.

- Upon registration, the employee's status will change to "Active" if permitted by your plan's limitations. Otherwise, they'll be in "Blocked" status, and you'll need to manage their access based on your plan's terms. An "Active" status grants access to the service and designated scripts.

Option 2 - by importing employees from Excel.
-
Access your account and navigate to the "Employees" section. Select the type of employee and then click on the "Import Employees from Excel" button.

- Follow the provided instructions for importing employees, including selecting the file and initiating the import process by clicking "Start Downloading".

- Imported employees will be added to your list with their email saved in the system. Duplicate entries for the same email address are not allowed, ensuring efficient management. You may want to cross-check the existing database to avoid redundancy.

- Upon receiving the invitation email, the employee should follow the link to complete registration within the service. After filling in the required fields, they must click on "Complete Registration".

- If the employee didn't receive the invitation email for registration, you can manually copy and send them the invitation link via email, Skype, or any other method.

- Upon registration, the employee's status will change to "Active" if permitted by your plan's limitations. Otherwise, they'll be in "Blocked" status, and you'll need to manage their access based on your plan's terms. An "Active" status grants access to the service and designated scripts.

How to block and delete employees
Employee lockout
-
To lock an employee, navigate to the “Employees” section and click on the lock button located to the right of the employee's information for locking purposes.

- Upon confirmation of the lockout, the employee's status will change to blocked. They will no longer have access to make calls or utilize the service. To unlock an employee, click on the green head icon.


- If you wish to lock all operators or designers simultaneously, utilize the general lock button.

Removal of employees
-
To remove one or multiple employees, click on the "To archive employee" or "To archive all employees" button respectively. This action will lock the accounts of the respective employee(s) and transfer them to the archive section.

- Next, navigate to the Menu -> Data Archive.

- From the archive section, you have the option to permanently remove an employee or reintegrate them back into the team (reintegrated employees will be in a "Blocked" status).

- If an employee is deleted, their account will be marked as deleted (this will be reflected in the reports, indicating the deletion), their rights will be revoked, and it will not be possible to restore the employee. In such cases, the employee must be invited again to work within the service.
How to provide rights for staff to use scripts
-
To assign permissions for scripts and folders to employees, navigate to the "Employees" menu section and click on the "wrench" icon located to the right of the desired employee's data.

- A modal window will appear, providing access to scripts and folders (if available).

- The access settings for scripts (such as the ability to call for operators and call/edit for designers) are managed through checkboxes, as illustrated in the image. Once you've granted access rights to scripts for an employee, click the "Ok" button.

- If you're working in CRM and need to streamline the process using the "Call Script Prompter" widget in CRM, you can set a script for automatic start by granting the employee rights to it (item 3) and selecting the script by clicking on the radio-button next to it. This will initiate the selected script immediately upon launching the widget, bypassing the script registry.

- If you need to grant script rights to all employees, you can manage access rights within the script registry.

- The process of assigning rights follows a similar procedure as described above. Follow the instructions in the modal window to determine which employees can utilize the script for calls, then click the "Save" button. Additionally, you can designate the script as the starting one for calls from CRM, either for yourself or for all employees. If you choose to make the script the default for all employees, ensure access rights are granted to avoid errors.

Service payment
How to pay for the service
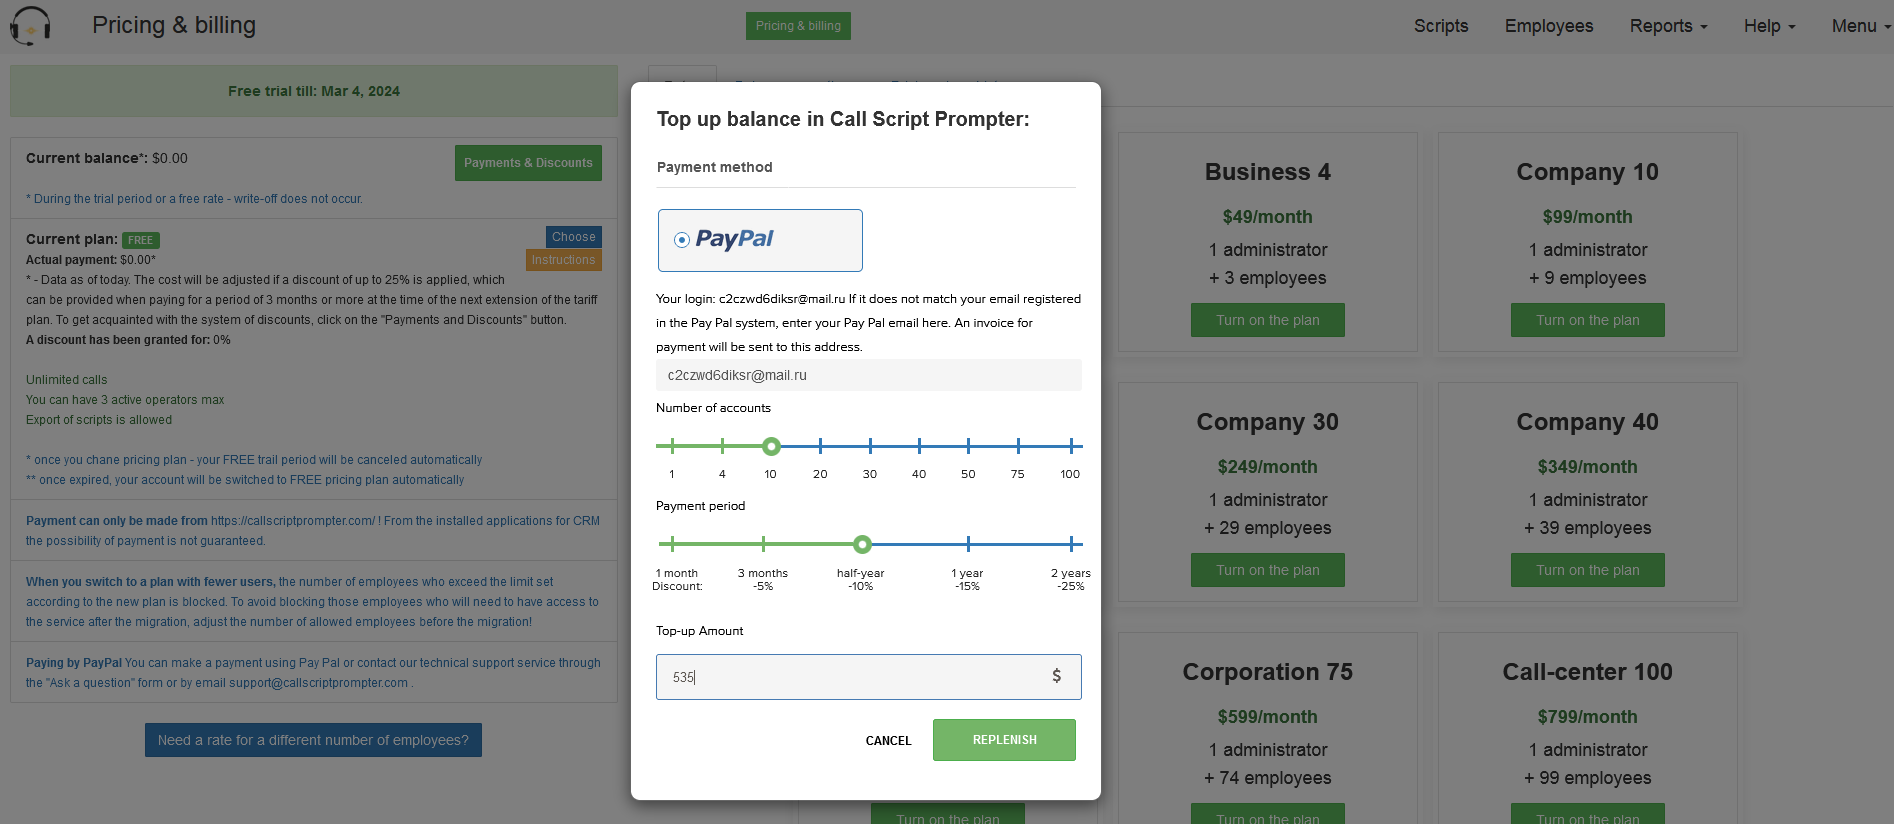
To pay for the "Call Script Prompter" service, click on the "Pricing & Billing" button in the menu and then on the "Payments & Discoounts" button.
A modal window will open with a choice of payment options, number of users and payment period.
Payment by PayPal
- Click on the number of users you need and the payment period for which you want to make a payment. Pay attention to the discount scale, it allows you to save up to 25% of the payment amount and fix the cost of the service for the selected period of time. If you want to recharge your account balance with any amount - just enter it in the "Top-Up amount" field.
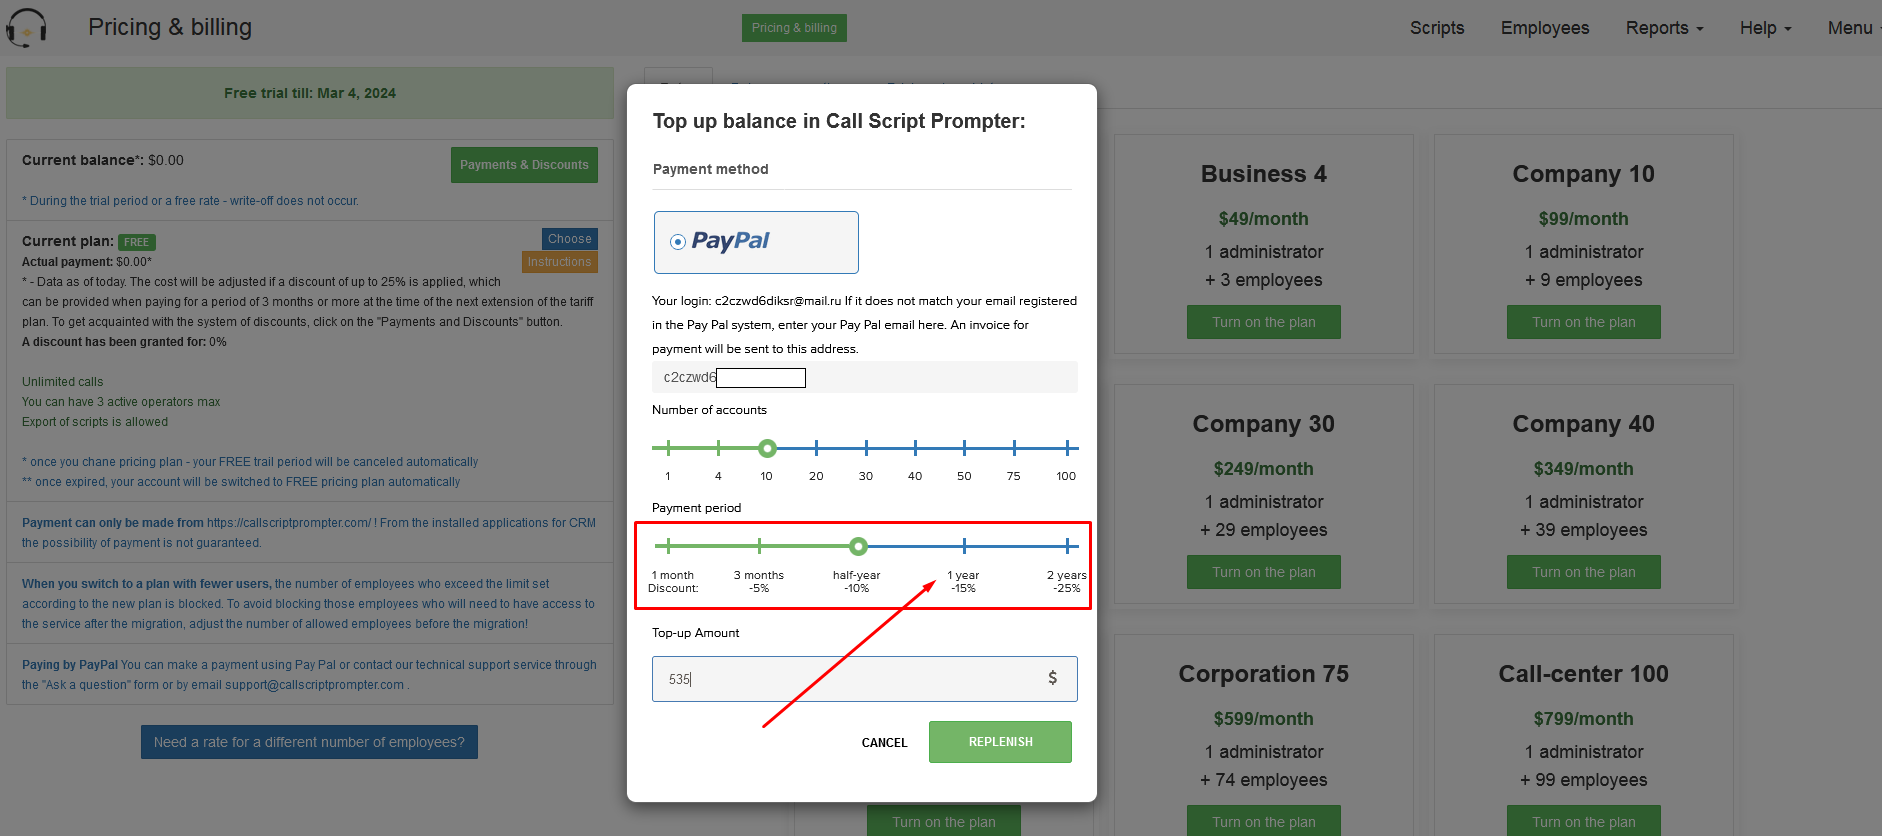
- After selecting all the options, click on the "Replenish" button. After some time, you will be issued an invoice for payment and you will receive a notification about a new invoice in your Pay pal account.
After payment, please notify us via chat on the website so that we can credit your balance as quickly as possible. After this, you can activate the tariff plan you need.
Account deleting
How to delete an administrator account
-
Access your account on the "Call Script Prompter" platform from the menu section, then click on the "Cross" icon situated to the right of the phrase "Send a request to delete an account".

- Once you've clicked to delete the account, a confirmation message will appear on your screen.

- Navigate to your email inbox, which corresponds to your login, and locate the email from "Call Script Prompter" with the subject "Requested to delete the manager's account in «Call Script Prompter». Please read this letter carefully! Click on the "Confirm deletion" button within the email.

- Following the confirmation of account deletion, you will receive a system-generated notification.

- Upon receipt of your deletion request, a service specialist will either approve it or reach out to you within 2 days to clarify the reasons for deletion. Subsequently, your account, along with the accounts of your employees within the "Call Script Prompter" service, will be erased.
How to delete an employee's account
-
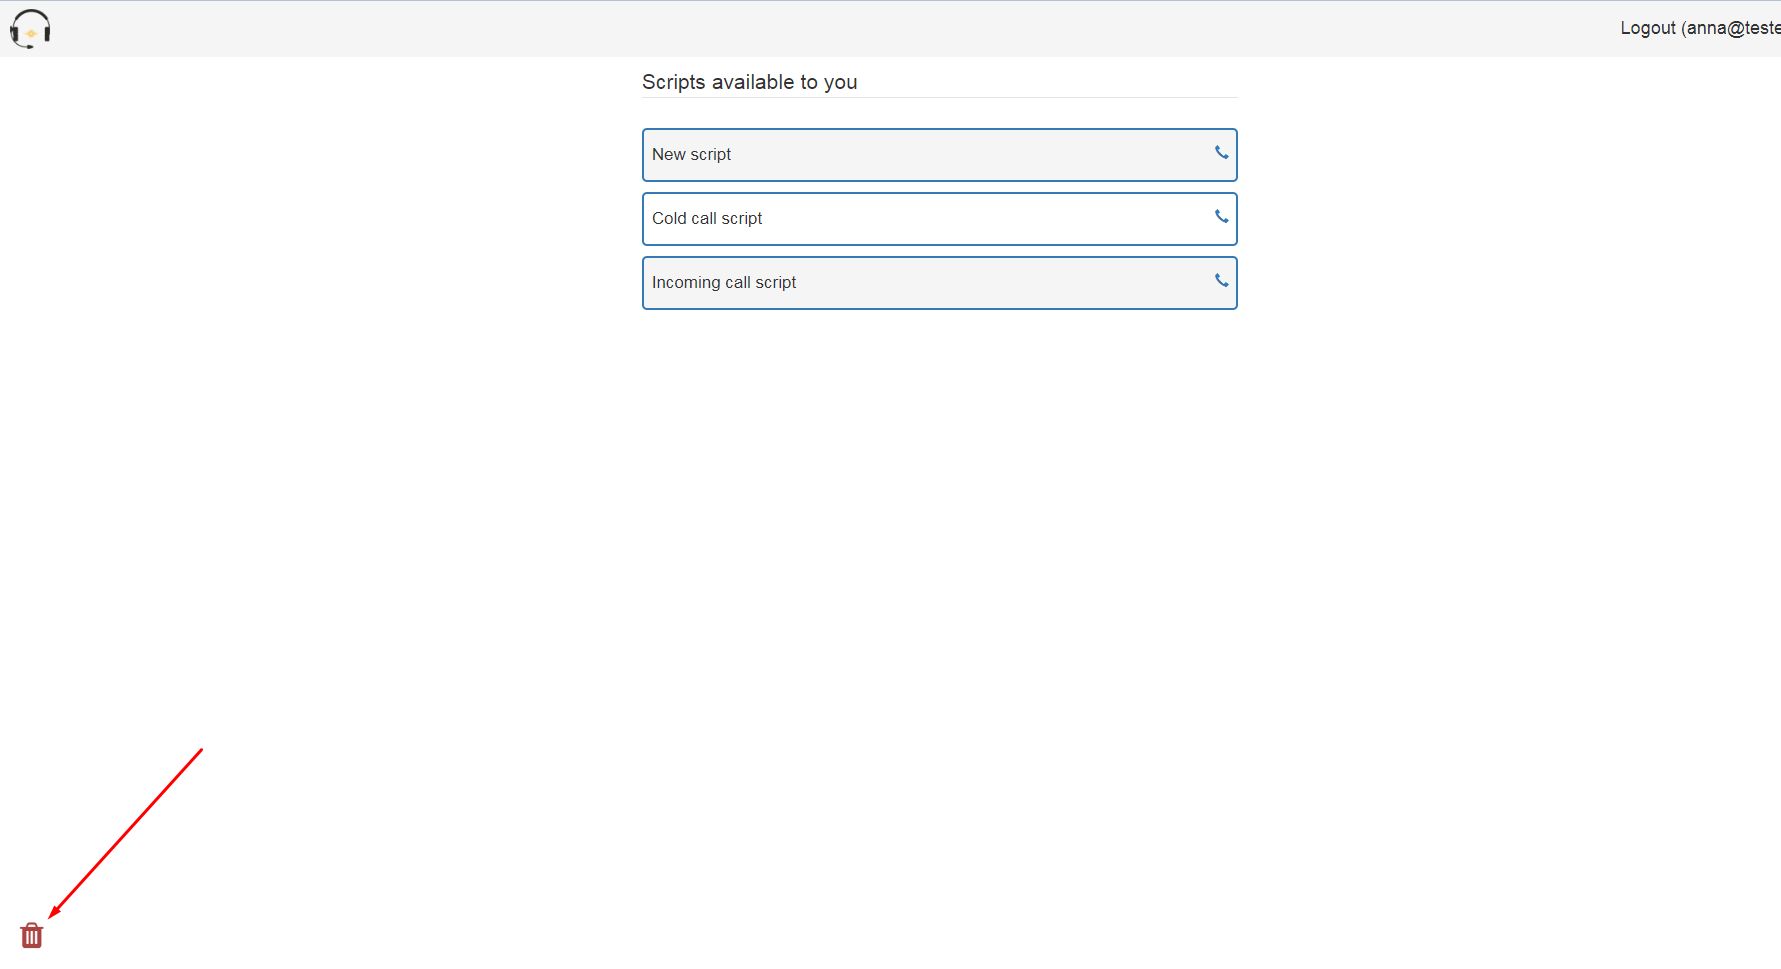
Log
into his "Call Script Prompter"
account and click on the "Cross" icon at the bottom left (the
password, if necessary, can be changed in the manager's account, you can archive
and then delete employee accounts there).
- Confirm
the need to delete, a message will appear on the screen.

- The manager must open a letter sent to the address that is his login and approve the deletion of the account.


